← World Vault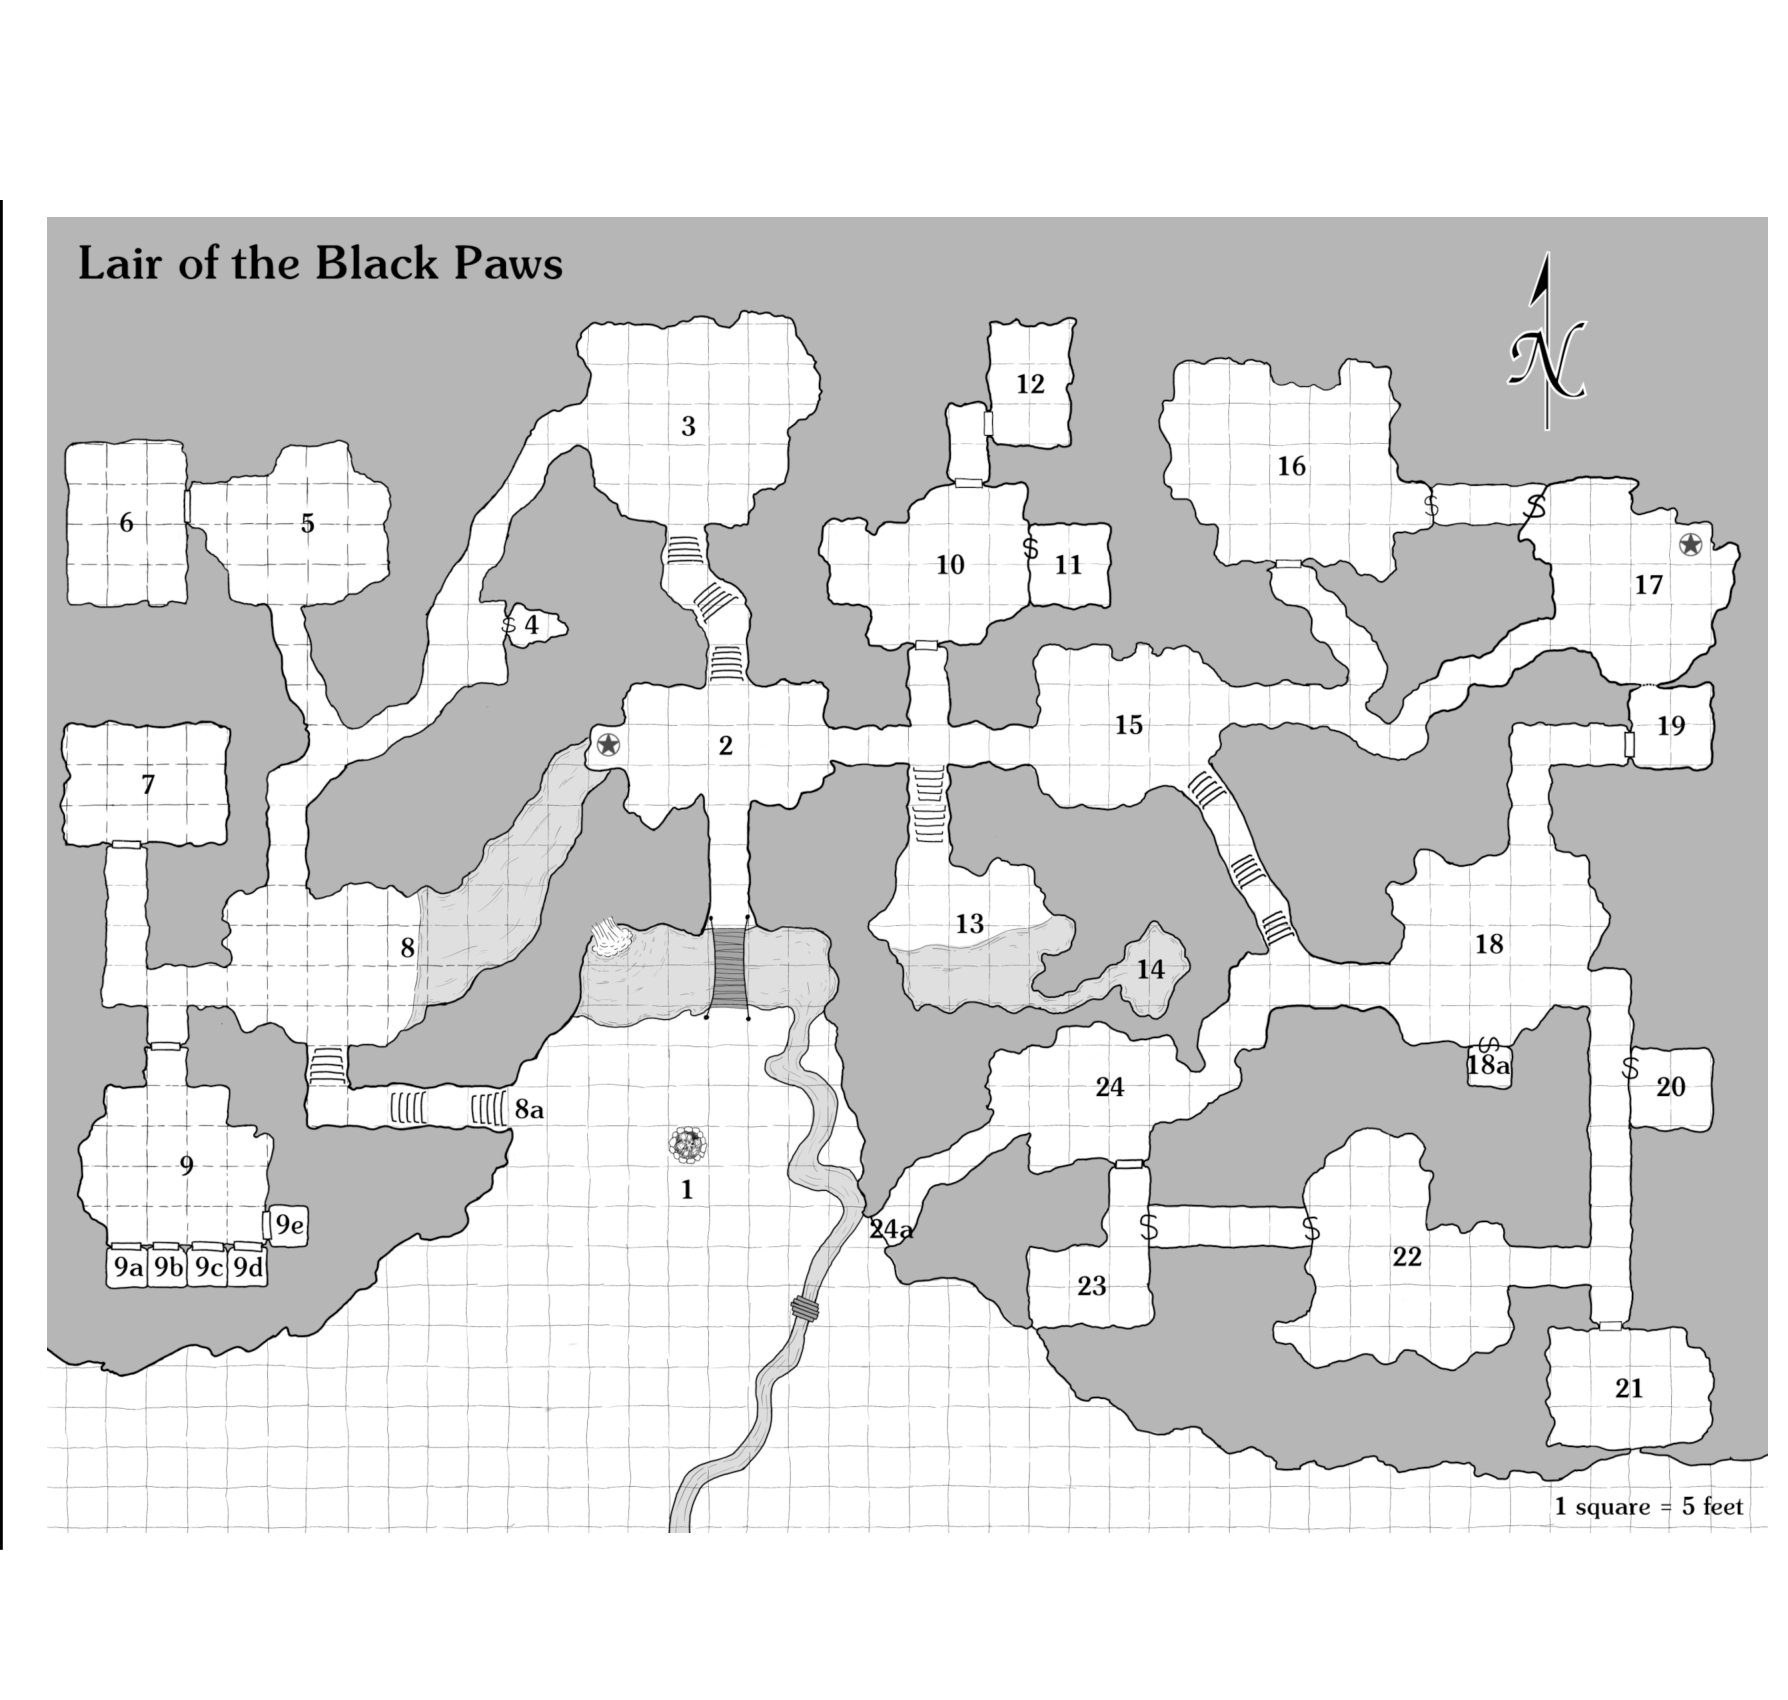
dungeon
The Black Paws Cave
hrs1-cave • hrs1-cave • HRS1: Barks and Blades
hat’s Going On? The Black Paws are a tribe of barklings - a ferocious, diminutive, schnauzer-headed humanoid race. These creatures have established their lair in this abandoned cave (turned mine) about three months ago. Only recently however, after their number increased, did they become more brazen and started raiding the road and the surroundings of Péripont. Originally, this lair was a natural cave system, slowly carved by erosion and time. When men first moved into the region, prospectors visited and found several veins of copper in the mine. This was enough for miners to move in and start expanding the cave, digging new rooms and tunnels, while extracting ore. This event coincided with the construction of the Bridge of Validard and the foundation of Péripont. The mining operation lasted for about 60 years, until the copper deposit was exhausted. The miners all left town with the notable exception of Beggar Tom, who stayed in Péripont (see The Hamlet of Péripont). During the few decades in which the cave was left unoccupied, Pixies that lived in the woods around the abandoned mine moved in, enjoying the waterfall (see area 1), the fun tools left by the miners, and the protection the cave offered. They were unfortunately violently driven out by the barklings when the Black Paws moved in, in many cases abandoning some of their most cherished treasures (see area 24). Nowadays, the pixies often come back inside to furtively retrieve whatever valuables they left behind and harass the barklings, but such skirmishes have so far proved to be unfruitful. These operations are hindered by the presence of many barklings, but also their hounds and their keen senses that can detect the pixies even when they are invisible. Most of the mining tools are now gone and the Black Paws have established a permanent settlement here. Three main areas compose this cave: the lower level (rooms 3 to 8a) the main floor (room 2 and 10 to 17), and the upper level (rooms 18 to 24a).
Wandering Monsters: Wandering Monsters | 1. 3d4 Barklings (15 total): AC 13 (leather), HD ½ (1d4 hit points), #At 1 bite or 1 dagger, Dam 1d4 bite, 1d4 dagger, Mv 30', Sv NM, ML 7 (9), XP 10 ea | 2. 1d6 Dogs (6 total): AC 14, HD 1+1, #At 1 bite, Dam 1d4 bite, 1d4 + hold, Mv 50', Sv F1, ML 9, XP 25 ea | 3. 2d4 Giant Centipedes (7 total): AC 11, HD ½* (1d4 hit points), #At 1 bite, Dam poison bite, Mv 40', Sv NM, ML 7 (special), XP 13 ea | 5. 2d6 Giant Rats (12 total): AC 13, HD ½ (1d4 hit points), #At 1 bite, Dam 1d4+disease, Mv 40' Swim 20', Sv F1, ML 8, XP 10 ea | 6. 3d6 Pixies (10 total): AC 17, HD 1*, #At 1 dagger, Dam 1d4, Mv 30' Fly 60’, Sv E-F1, ML 7, XP 37 ea Restocking the Dungeon: if the party retreats to Peripont, there is a cumulative 10% chance per day spent out of the dungeon that something happened (automatic after 10 days); roll 1d8 on the Occurrence table: 1. 1d4 of the remaining barklings have left the cave. 2. All the remaining barklings have retreated to the cave's upper level and barricaded themselves there. 3. The barklings have barricaded the main entrance and entrance 8a and are guarding entrance 24a around the clock. 4. 1d4 barklings have arrived as reinforcements. 5. 2d4 barklings and one dog have arrived as reinforcements. 6. 2d4 barklings and two dogs have arrived as reinforcements. 7. 3d4 barklings and 1d4 dogs have arrived as reinforcements; they also brought treasure type J+K in a small chest. 8. 4d4 barklings, 1d4 dogs, and a 2 HD barkling chieftain have arrived as reinforcements; they also brought treasure type E in a small chest.
CHILDREN • 32
1. Cave Entrance room
This area is outside the cave. From here the cave can be entered by three different entrances (see below). When the PCs get within a half mile of the entrance, read the following boxed text. After hours walking through the woods, you see a thin column of smoke piercing through the trees. Clearly, someone is burning something. You are unsure of who lit the fire, but you are certain that it is close and still burning... At this point, the GM should leave it up to the PCs to either go investigate or retreat back to Péripont. If the players decide to get closer, enough to see the entrances and the rope bridge, read the following boxed text. Getting closer, you hear the sound of falling water. Pushing through, you find yourselves in an area filled with thickets where you manage to hide to observe. Before you, opens a small clearing stuck between the woods and a hill. On the side of the hill facing you, you see an imposing cliff side from which a small waterfall pours into a shallow pond. A gentle snaky stream of water flows from the pond into the woods. You notice a few openings on the cliff side, likely entrances that lead into caves. Piles of tailings, abandoned mining material, and even remains of an old broken cart are scattered in this clearing. A large fire pit burns as two small dog-like humanoids appear busy playing with something on the ground. The noise of falling water resonates on the rock wall, making it hard to hear, but you are convinced that you have found the entrance to a cave. There are two barklings standing guard in this area. If enemies approach, they are ordered to retreat and warn the guards in area 3. The two creatures will not be paying attention to their surroundings and can be easily surprised if the PCs decide to sneak up on them. Their attention will be focused on a game called Fizzle which is played with two 12-sided ivory dice on which the 12 zodiac signs have been carved. Rules for Fizzle are not given and this game’s modalities are left up to the GM to determine. The set of dice is worth 5 gold pieces. 2 Barklings: AC 13 (leather), HD ½ (1d4 hit points), #At 1 bite or 1 dagger, Dam 1d4 bite, 1d4 dagger, Mv 30', Sv NM, ML 7 (9), XP 10 ea. HP One barkling has a belt pouch that contains 13 cp and 10 sp, while the other one has one that holds 12 cp and 14 sp. The second one also wears a crude necklace made out of a string of leather and three bear teeth (worth 2 gp). Both wear barkling sized leather armor. None of the mining material found in this area is still usable and the rubble is mostly composed of residual copper ore and rock that was dug out of the cave. An old broken cart can also be found, but it is missing both its wheels. There are three entrances to the cave that can all be accessed through this area. The first one leads to area 2. The entrance is 6 feet wide and 8 feet high. It is accessible through a small rope bridge that crosses the narrow pond fed by the falling water. Although it is quite old, the bridge still holds. The bridge can be destroyed by cutting its main ropes; doing so takes 1d6 minutes and requires sharp tools or weapons. The second entrance is located to the west and leads to area 8a. When coming from area 1, the PCs will see a small opening on the cliff (5 feet wide and 7 feet high). A small set of stairs leads down into darkness. Finally, the last entrance is located to the east, 15 feet above the ground. It can only be accessed by climbing, either with a special ability or using a rope. It leads to area 24a. The entrance is 5 feet wide and 6 feet high. Accessing it from area 1 will be challenging, but a thief could climb on the rocky surface or an adroit character could use a grappling hook. Exactly how this area is accessed is left to GM interpretation, but it should be the least obvious choice when entering the cave.
2. Entrance Hall room
Entering this room, you notice a slight sunlight illuminates this area. The room is relatively big and opens on three corridors. Its walls are decorated with unsettling ornaments composed of bones, branches, feathers, and flowers. These odd constructions depict unusual monster-like figures that immediately evoke disgust. In the side of the room that has no exit a small well has been dug into the ground. The lack of furniture and the multiple traces of footsteps on the floor indicate that this is a high traffic area, probably a hall of some sort. This area is the main entrance of the mine. It was originally a natural room, but was expanded by the miners decades ago. Dim light is provided by the entrance to the south but going further into the cave will require a torch or some kind of lighting. If the PCs inspect the well, read the following boxed text. This small well appears to be a natural hole in the ground around which a small wall was erected with rocks and mortar. The structure is no more than three feet tall and a rope attached to a wooden bucket lies on the floor next to it. On one of the rocks composing the well’s wall, the word "POISON" is carved in messy handwriting. This well opens on the ceiling of area 8, right above the deepest portion of the partially flooded room. It is possible to see the water 15 feet below, but this will require a torch or some other kind of lighting. The water is potable and not poisonous at all; the word "POISON" was written decades ago by Beggar Tom (see Beggar Tom in The Hamlet of Péripont) as a joke meant to scare his fellow miners. It is possible to descend into area 8 using this well and a rope. If the PCs decide to inspect the ornaments, read the following boxed text. The ornaments in this room give you the chills as soon as you look at them. All around the room, various fantastical creatures have been assembled using animal skulls, branches, feathers, and other worthless materials. These decorations, which amount to six, are either suspended from the ceiling or attached to the walls. They vary in size but their average dimensions are similar to those of a large dog, perhaps a wolf. These ornaments were displayed here by the barklings to repel intruders. Besides being incredibly creepy, they serve no particular purpose and have been placed there to scare off intruders and wild animals, a bit like a scarecrow would. There is nothing of value in this room.
3. Lower Resting Area room
This room is furnished with two small round tables and odd looking stools which appear to have been crudely modified to be higher than their original design intended. In the far end of the room, a long table is placed against the wall. On top of it, a few small kegs lie flat next to which stand a couple of glass bottles and many wooden mugs. If there are still barklings in this room when the PCs first enter it, read the boxed text below. As you enter, seven barklings stand up from their stools brandishing small swords, aggressively growling and barking. This room is a resting area for the barklings. When they come back from expeditions out in the wilderness or when they simply want to enjoy a mug of ale, they’ll come here to have a drink and play cards or Fizzle. If the PCs fight barklings when they first walk into the room, the creatures will all be drunk and thus fight with a -1 penalty to all their attack rolls, armor class, damage rolls, and saving throws. Moreover the creatures will all be rendered more courageous by their drinks and will fight with a base morale value of 8. 6 Barkling: AC 13 (leather), HD ½ (1d4 hit points), #At 1 bite or 1 dagger, Dam 1d4 bite, 1d4 dagger, Mv 30', Sv NM, ML 7 (9), XP 10 ea. HP Barkling Warrior AC 15 (chainmail), HD 1, #At 1 bite or 1 dagger, Dam 1d4 bite, 1d4 dagger, Mv 20', Sv NM, ML 7 (9), XP 25 HP Approaching from the southwestern corridor, the PCs will be able to surprise the barklings on a roll of 1-4 on a d6. Things will however be different if the PCs arrive from the descending stairs (to the south) since the noise of their steps will resonate and will have a reasonable chance of alerting the barklings. Hence the PCs have a 1-2 chance on a d6 of being surprised coming from the stairs while the barklings will only be surprised on a roll of 1 on a d6. On the improvised service table, the PCs will find two kegs of Dwarven Ale, one of which is half-way empty. The other one is full and could be sold for 20 gold pieces (weighs 15 lbs). Next to it, two bottles of spirit can be found. They both contain Elvish Myrlir Brandy, a very strong and highly flammable beverage that must be cut with water before consumption. Each bottle can be sold for 25 gold pieces (2 lbs each). Moreover, if used as a grenade-like weapon, treat it as a pint of flaming oil. Since the barklings were playing games, their money will be on the tables, ready to be gambled. On one of the two round tables, among a scattered deck of tattered playing cards, the PCs can find 38 cp, 42 sp, and a bronze necklace holding a medallion shaped like a flying goose (worth 10 gp). On the other round table, between dirty mugs of ale are 40 cp and 31 sp. There is also a set of dice used to play Fizzle similar to the one found in area 1.
4. Zombie Miners room
Note to GM: This is a secret area that can be found if the PCs inspect the wider part of the corridor linking areas 3 and 8. At first glance, there is nothing indicating there might be anything here. If the PCs search and find the secret entrance to this area, read the boxed text below. Looking at the wall in this wider part of the tunnel, you notice something strange. A portion of the wall looks like it is composed of an amalgamation of rubble and large boulders rather than the usual solid rock wall. The impression you get is that this is an opening that was closed off, likely by the collapse of the cave’s ceiling. Removing the boulders and rubble requires quite an effort; it will take 1d4+2 turns to clear enough rubble to let someone through. Moreover, moving a boulder requires at least two strong individuals, meaning that at least two characters with a minimal strength score of 13 will need to participate in the clearing effort, else the PCs cannot possibly move the heavy boulders with their bare hands. Using picks or shovels can reduce the length of the clearing effort by 2 turns. Once the PCs manage to clear the way and reveal area 4, read the following description. The opening is very dark but once you get closer, you hear noise. At first you are not sure what this noise is, but soon realize it is some kind of deep moan. It is, however, already too late to back up and two animated corpses emerge from the cleared opening and walk slowly and clumsily towards you. These two zombies are miners that came to the then abandoned mine a few years after the official mining operation ended. They planned on opening a new gallery in search of a new copper vein, but lacking the proper tooling and expertise, the newly dug tunnel collapsed and the two men were trapped inside. They had no supplies, but three vials of a cursed nectar that gives eternal life, or so they thought. The Cursed Nectar of Nodznir is a potion of which an individual dose is enough to turn the drinker into a zombie. If a save vs. Death Ray or Poison is failed, the person dies in 1d6 hours and then instantly reanimates as a zombie. A successful save still does 2d8 points of damage to the drinker and, should he die that way, he will become a zombie immediately after he has died. 2 Zombies: AC 12 half damage from blunt weapons, 1 point only from arrows, bolts, or sling stones, HD 2, #At 1 bludgeon, Dam 1d8, Mv 20', Sv F2, ML 12, XP 75 ea. HP The two zombies will not have any recollections of their past and will simply attack mindlessly any living creature they encounter to eat it. One of the zombies wears a stained silver necklace of poor quality (10 gp). If the PCs search the collapsed tunnel, they will notice that this was a new tunnel the two men were digging and it collapsed, forever trapping them. They will find three vials of the Cursed Nectar of Nodznir; two will be empty and another one will still be full. The PCs will also find some old mining equipment; a pick, a shovel, and a small hammer.
5. Improvised Warehouse room
This room is fairly large and also has ceilings that are unusually high for the cave, standing at almost 8 feet. All around you, crates and barrels are neglectfully disposed, hinting that they have already been searched and likely emptied of their content. There are about twenty crates, all piled up in a disorganized fashion, as well as a dozen empty barrels in this room. A few old rusty and broken tools can also be found, though nothing is still serviceable. If the PCs spend one turn going through all the crates though, they will find one that contains a small terracotta statuette representing an elephant. It is 1-foot wide and 8 inches tall. Obviously, such creatures are unknown in these parts of the world and this statuette will appear quite exotic unless one of the PCs comes from a savanna-like or a jungle region. The elephant figure is quite old and missing its left ear, right tusk, and left back leg. Even if it appears quite primitive and damaged by time, the statuette displays an interesting level of detail. If broken or otherwise opened, the PCs will realize it is actually hollow and contains a small jute bag in which 700 cp, 300 sp, and 30 gp are hidden. The coins are exotic looking, having been minted in a far away land. There is nothing else of value and no threat in this room.
6. Stolen Goods room
The door to this room is locked; the key is held by the jailer in room 9. Once the PCs manage to enter the room, read the following description. In this room, you find another small warehouse where, it seems, more valuable goods have been stored. Looking at the crates and barrels, you notice that they look far more recent than what you found in the other room. Each container is labeled with a blue insignia representing a shield and a scale. Unfortunately, the door is also trapped. A makeshift trap was placed above the door. When the door is first opened, a battleaxe will swing down, hitting the person that opened the door. The trap has an AB of +1 and deals 1d8 points of damage on a successful hit. It can be disabled normally by a thief who will find an odd metallic string on the top-left corner of the door. The goods found herein are the property of the four ambushed merchants (see Missing Cargo in Introduction). If Marbic (see area 9e) is brought here, he will want to bring these goods back to Péripont to sell them to Gistor Blez (see The Broken Anvil in The Hamlet of Péripont). Doing so is complicated and requires a functioning cart or some other way of carrying the goods. The PCs should also receive a generous reward. These crates and barrels contain the following: two kegs of beer, a crate containing 12 bottles of brandy (2.5 lbs each), six sacks of rye flour (10 lbs each), six sacks of wheat flour (10 lbs each), two barrels of salted lard (110 lbs each), two crates of sea salt (70 lbs each), two amphorae of olive oil (40 lbs each), eight crates of chinaware (fragile, 20 lbs each), and a small crate containing 12 pints of oil and two lanterns (one is broken). The whole shipment can be sold for 150 gp.
7. Armor Workshop room
This room appears to be some kind of workshop in which tiny chain mail armors are crafted by the barklings. There are three small workbenches, hastily assembled with branches and logs. They are covered with thousands of tiny iron rings and various tools such as hammers and pliers. A few diminutive chain mails are hanging on a wooden rack in the far end of the room. If there are still barklings in this room when the PCs first walk in, read the boxed text below as well. Six barklings are busy mending their chainmails and are visibly surprised to see you. Turning toward you as you enter the room, they abruptly push their tools aside, pull out small swords and charge you, growling aggressively. Being cornered in this room, the barklings will fight to the death or simply surrender should they fail their morale check. None of them are wearing armor. Other than six tiny chain mails, there is nothing of value in this room. Note that the chain mails are fitted for barklings and will be too small even for halflings. They could be sold as toys for 5 gp each. Looting the bodies, the PCs can find the following coins: 98 copper pieces and 62 silver pieces. Additionally, the toughest barkling will be wearing a silver necklace with spiral pattern (treat as a bracelet for larger creatures) worth 10 gold pieces. 6 Barklings: AC 11 (unarmored), HD ½ (1d4 hit points), #At 1 bite or 1 dagger, Dam 1d4 bite, 1d4 dagger, Mv Unarmored 40', Sv NM, ML 7 (9), XP 10 ea. HP
8. Partially-Flooded Room room
Snaky in its shape, this room is quite large and partially flooded. Two exits open on corridors while the third one does so on a set of ascending stairs. A high level of humidity fills the air, clearly coming from the water that fills approximately half the room. The walls are covered with damp and a large flag hangs on one of the walls. The flag is quite large, red in color, and displays a large black paw sign. The remains of two broken barrels litter the shore, while large bones are scattered across the room. This large hall branches off to a few sections of the lower portion of the cave. There are no monsters nor traps in this area. To mark their territory, the Black Paws installed a large banner bearing their emblem on the northern wall, between the corridor and the water. If the PCs look for tracks or signs of creatures, they will notice this is a high traffic area, with many small bipeds having passed through recently. The flooded portion of the room is 3 feet deep and the water is clear. If the PCs decide to search the bottom of the pool for at least one turn, they will be able to locate a beautiful finely cut sapphire (100 gp) stuck between two rocks. At the far end of the room, to the east, the ceiling opens into a vertical conduit. This opening connects to area 2 through the well. The well stands 12 feet above the water and can be accessed if the PCs use a rope. An agile thief might even be able to climb up though doing so might prove to be perilous. Below the well, coins have been thrown over time by miners and visitors, hoping a wish would materialize. Hence, if the PCs spend 1d4 turns looking for coins below the water, they will be able to find 234 cp, 158 sp, 38 gp, and 4 pp. If they spend only one turn searching, they will only find half of the amounts given above.
8a. Lower Entrance room
Note to GM: This entrance grants access to the lower level of the cave, 15 feet below the surface. This entrance leads deep into the ground. Small sets of stairs have been carved out directly into the stone, digging always deeper as sunlight dissipates... This entrance is trapped with a snare trap strategically placed at the bottom end of the middle set of stairs. Each passing player has 2 in 6 chance of triggering the trap (no save allowed). If the trap is triggered and the barklings are still in area 1, they will come investigate in this area. If not, then the GM should still check if a random encounter happens. Should the PCs ask, this hallway is not natural and was clearly dug out by someone. It is not obstructed in any way, though it doesn’t appear to be used frequently.
9. The Jail room
Unusual for this location, this area appears to be some kind of jail though it looks more like a locker room than anything. It is mostly empty, save for a chair and two blankets on the floor. Beside the large room, five smaller individual cells are lined at the opposite end of the room, each with a wooden door and window barred with iron. Entering this area will prove to be difficult as it is locked from the inside and guarded by Dingo and his hounds. This is also where Marbic and Roderic Drekh are kept captive. A detailed description is given for each cell (see area 9a through 9e). Dingo is a tougher barkling that mostly keeps to himself and dislikes the company of others. He seldom leaves this area, being very dedicated to guarding it. His only companions will be two hounds, Crapo and Bite, whom he adores. These dogs are very obedient and will be commanded by Dingo to act in battle. The door to this room is kept locked at all times and only Dingo has the key. If he ever suspects that a threat looms on the other side, he will keep the door closed and brace for battle. The barkling is, however, not too bright and will be easily tricked into opening the door if the PCs come up with a reasonably clever plan. They could, for instance, make a captured barkling ask to open the door or even impersonate one of them. The hounds will, however, be a lot less easy to dupe unless, of course, an unusual treat is thrown at them. If both dogs are killed, Dingo will become frantic and fight to the death to avenge his hounds, immediately granting him a morale value of 12. Dingo: AC 15 (chainmail), HD 1, #At 1 bite or 1 small battle axe, Dam 1d4 bite, 1d4 small battle axe, Mv 20', Sv NM, ML 9 (special), XP 25 HP Dingo has a small pouch that contains 16 copper pieces, 12 silver pieces, and 6 gold pieces. Hanging from his belt, is a potion of Cure Light Wounds. He fights with a smaller version of a battleaxe and wears chainmail. Dingo also has a key ring with eight keys; one that opens the door to room 9, one for each of room 9’s cells, one that opens the door to room 6, and finally one that opens one of the locks on the door that leads to room 10. 2 Dogs: AC 14, HD 1+1, #At 1 bite, Dam 1d4 + hold, Mv 50', Sv F1, ML 9, XP 25 ea. HP
9a. Empty Cell room
The door to this cell is open. It is currently empty, but fresh straw on the floor and a bucket of dirty water indicate that someone was held captive in here recently. This cell is empty. This is where Krix and Blid were imprisoned before being sent to work in the kitchen (see room 21). There is nothing of value in this room.
9b. Roderic’s Cell room
As you get closer to this cell, you hear a faint moan, as if someone is crying. Approaching the door, you peek into the cell through the barred window and see a child, no older than ten, terrorized and huddling in the corner of the cell. He finally raises his head, looking at you, and says "You… You are not with the dog-men, are you?" The child held captive in this cell is Roderic Drekh, son of Philibert Drekh (see Stranded in the Woods in Introduction). He was captured by the Black Paws along with his mother, Naerie Drekh (see room 22) about a week ago while mushroom picking in Badgerwood. Roderic will be exhausted and hungry when first encountered. Moreover, the child will be extremely worried, fearing the worst might have happened to his mother. The boy has short dark hair and wears a wool tunic tightened by a leather belt, tight pants, and a pair of boots. His clothes are ragged and dirty and he has bruises on his face and arms. Roderic is polite and respectful and will be truly thankful for the player’s help. He will, however, insist on finding his mother. He knows she was in a cell until recently but was brought somewhere else by the barklings. Naerie’s whereabouts are unknown to him though he remembers Dingo asking her if she knew how to cook before taking her elsewhere. If the PCs want to leave the Black Paws’ Lair without his mother, he will stay in the cave and look for her. Should the PCs insist on bringing him back with them, he will run away and head back to the cave with the intention of rescuing his mother. Roderic Drekh, Normal Man: AC 11, AB +0, #At 1 by small weapon, Dam 1d4, Mv 40', ML 8, XP 10 HP
9c. Hidden Treasure room
As with the other empty cells, the door to this one was left open. There is nothing inside, not even straw, indicating that it has not been used in a while. At first, this cell will appear completely empty. If it is searched however, it is possible to find a loose stone on the southern wall. If removed, it will reveal a small compartment that contains a rotten leather pouch. In it the PCs can find 125 cp, 30 ep, 2 gp, and a fancy amethyst (75 gp).
9d. Another Empty Cell room
The door to this cell is open. It looks like it was recently occupied, judging by the straw, the remains of food, and the bucket of dirty water in one of the corners. Until four days ago, Naerie Drekh was kept in this cell. She was brought out at the request of Lord Rosk, who didn’t enjoy the food his kobold prisoners cooked for him (see rooms 21 and 22). The poor woman has since been working as a cleaner and a cook in the upper level of the cave.
9e. Marbic’s Cell room
Getting closer to this cell, a voice calls you. "Hey, I hope you didn’t plan on leaving me here!" says a man, jokingly while he holds the bars of his cell. Smiling at you, he winks, pointing at the door’s lock. This man is Marbic, a merchant captured by the Barklings three days ago on the Northern Road, not too far north of Péripont (see Missing Cargo in Introduction). Marbic is a tall young man, with short red hair and a beardless visage. He often smiles despite the rough life he lives as a small time merchant. Marbic Krami: AC 11, #At 1 weapon, Dam by weapon +1, Mv 40', Sv F1, ML 8 Marbic is a 1st level Fighter. STR 14 (+1), INT 10, WIS 12, DEX 12, CON 13 (+1), CHA 11 HP When found, Marbic will have no equipment and will be wearing nothing but dirty clothes. If freed from his cell, the man will know he owes the PCs and will be more than happy to stay and help them. When the time to leave the Black Paws Lair comes however he will request the PCs to help him bring back at least some of the goods that were stolen from him to Péripont. This task is impractical given the rugged terrain and the lack of transportation, but he will nevertheless insist that he must deliver those goods to Giztor Blez (see The Broken Anvil in The Hamlet of Péripont). If the PCs help him do this, they will be rewarded by Marbic once they get to Péripont. Completing his delivery is however a secondary goal. His first objective will be to seek revenge against his former colleagues that left him to die when they got ambushed by the barklings. Marbic also holds Nozar and Endil (see The Split Moon Inn in The Hamlet of Péripont) responsible for the death of Basil. Indeed, the version given by the two scoundrels is nothing but lies. As he recounts, Marbic and Basil stayed around the cart to defend it when they were ambushed while Nozar and Endil ran away, laughing and wishing them good luck. What Marbic does not know is that the two men heard of recent raids on the road and secretly insured the shipment in Douman. Their goal is to go back and split the insurance claim in two rather than in four. Marbic will be animated by a furious sentiment of vengeance and will seek to kill them both to make them pay for the death of Basil and the hardship he endured at the hands of the barklings. Will the PCs be able to reason with him or will they let him quench his thirst for vengeance?
10. Barkling Ancestors’ Rest room
The door to this room (coming from the south) is unusual since it is kept closed by two different locks. It is described below. At the end of a short corridor, you run into a heavy iron door. It appears to be more recent than the other doors found in this cave. Getting closer, you notice that two locks keep it closed and that opening it likely requires two keys. The door itself is imposing and breaking it seems unlikely without the proper tools and strength... Both locks can be picked, but the second one, which opens with Rosk’s key (see area 22), is very complicated; a Thief trying to pick it will have to do so with a 20% penalty (reduce the Open Lock target number by 20%). This room is a special room as it is considered sacred by the Black Paws and contains a great quantity of treasure. When the PCs first enter it, read the boxed text below. Once you manage to open the door, an odd spectacle unfolds before your eyes. At first, you all brace for combat as you notice the presence of five barklings. After a brief instant you realize that the creatures are in fact incredibly realistic statues of barklings. You are not sure what to make of this unsettling scene, but a few moments later, you realize these are actual barklings that have been stuffed and mounted on wooden bases. On the eastern wall, a large bookcase stands with small terra cotta urns placed on its shelves. At the other end of the room, a small wooden door faces you. Although it might seem odd to the civilized races, this unusual feat of taxidermy constitutes a great honor for barklings, just like the process of mummification was for ancient Egyptians. Indeed, when an important barkling dies, his body is preserved, clothed, and placed in a forever position that represented it best. The statues are carried from lair to lair by the barklings and are considered some of the tribe’s most valuable treasures. There are five stuffed barklings in this room, each with a small wooden sign at its feet. A detailed description is given for each below. Rex Baston This barkling has gray hair, and wears a small chain mail covered by a reddish tunic and a thin leather belt. It carries a small round shield and a handaxe. A small headband is laced around its forehead. The stuffed creature is endowed with various pieces of jewelry. On the wooden base at his feet, writings read "Rex Baston, The Lizard Slayer – Defeated in combat while fighting lizardmen". This statue is slightly taller than your usual barkling, being almost 4 feet tall. It wears a small gold necklace with a bear-shaped pendant with two tiny tourmalines lodged in its eye sockets (600 gp) and another necklace composed of a string of leather and an owlbear claw (2 gp). If the statue’s mouth is opened, the PCs will notice two of its teeth are made out of gold (5 gp each). Lord Fido Rector Short but buff, this one looks like it was someone very important. Its fur is damaged in random places and was clearly sewn back together. It wears a long red velvet cape on top of a magnificent barkling-sized plate mail. In its left hand, it holds a tiny scepter composed of a wooden handle and a jade bulb in the shape of a wolf’s head at the other end. Its other hand is raised as if addressing an assembly. Clearly someone of high status, this barkling wears a magnificent necklace of heavy links, and a beautiful gold ring set with a ruby on its right middle finger. The most impressive piece of jewelry is the gold crown the figure wears; a beautiful piece, decorated with various tiny gemstones and intricate motifs. A writing on the statue’s base reads: "Lord Fido Rector - Our beloved Duke, slain during the battle of Groompaz." The necklace is worth 800 gp, while the ring is worth 700 gp. The scepter is worth 600 gp, and the crown is worth 1,000 gp. Everything is sized to fit a barkling. Toby Barkor The writing at the statue’s feet reads "Toby Barkor, Battlemaster – Drowned in the Tourmaline". This one is also quite large for a barkling, being a few inches above the four feet mark and of strong build. The statue is dressed with an exquisite barkling-sized hauberk. It carries a spear, a kite shield, and a Norman helm covers its head. Over its armor, the barkling wears a white surcoat enhanced with a beautiful silver brooch shaped like a turtle and decorated with flakes of jade. The brooch worn by the statue is worth 600 gp. Luna Lolan This figure is the only female among the figures found in this odd burial place. It wears a long dark purple velvet mage robe, elegantly sewn with silver thread. In one hand, the figure holds a sinuous wooden staff while holding a scroll in its other hand. The writing below reads "Luna Lolan, Queen of Magic – Consumed by her own powers". The staff is not magical, but at the top end, it is set with a large blood stone (worth 100 gp). The scroll is a scroll of protection from undead. Loki Crocket Appearing much older than other statues, this one displays an aged barkling with a whitened face and hunched back. It wears an old out of fashion chain mail and carries a small battleaxe. On his right ear, the creature has a single gold earring shaped like a snake. Looking at the base of the statue, the following words have been carved: "Loki Crocket, Kobold Crusher – Died of old age after a life dedicated to slaying Kobolds." The earring is worth 50 gold pieces. When the PCs inspect the large bookcase on the eastern wall, read the following text. These shelves are old and dusty, but appear to have been moved here recently. About a dozen urns have been placed on these shelves. Each urn is made of terracotta and has a name carved on it. Next to the urns, a beautiful ornate silver vase is displayed as if it was an important collectible. Each of these urns contain the pulverized remains of other lesser important barklings. There is nothing but barkling ashes in these urns. The silver vase found in the bookcase is the Sprinkler of Saint Bebrah (see room 24 and 2. The Chapel of Saint Bebrah in The Hamlet of Péripont). The Sprinkler of Saint Bebrah: The item is composed of a vase (aspersorium) and a sprinkler (aspergillum). Both items are made of silver and decorated with words of prayers finely carved into them. If the vase is filled with water (contains up to 60 oz), the water will become holy and stay holy as long as it stays inside the vase. Using the sprinkler to throw water at an undead creature will preserve its holiness and cause the undead to suffer 1 point of magical damage. The two items must be used in conjunction in order for the effect to manifest. The item can be used as a ranged weapon, having a short range of 5 feet, a medium range of 10 feet and a long range of 15 feet. If the bookcase is dragged to the side or otherwise moved, a hole in the wall will be revealed. This opening is three feet squared, large enough so that a human character can crawl through it. This opening connects room 10 with room 11. The door to the north is made out of wood and is not locked although it is closed.
11. Hidden Room room
Crawling through the small opening in the wall, you enter this smaller room. There is not much in here; an old straw broom standing in one of the corners, an old dirty blanket on the floor, and a decrepit wooden barrel. Placed on the barrel is something wrapped in a dusty piece of cloth. There is nothing threatening in this room. Wrapped in the piece of cloth, a magnificent dagger +1 with a gold pommel and tiny gems on the cross-guard can be found.
12. Gnomes Statue room
Opening the door, you reveal a modestly sized area. There is nothing in this room except for a large circular statue. It represents three gnomes forming a ring by holding hands. The gnomes have long beards and pointy hats and each displays a specific emotion: fear, sadness, and joy, or so it seems. These figures are almost as big as actual gnomes, standing at almost four feet and the ring has a diameter of almost six feet. At the center of the circle, a large bowl-like receptacle has been added. Finally, it looks like this statue was carved out of a single block of black basalt. This statue is highly magical and is the key to freeing the prisoner from its magical prison (see below). The person trapped inside will not remember how they got imprisoned. The crystal orb is known as the Orb of Confinement (found in area 18a). At some time in the past a ritual was performed with a prisoner standing in the midst of the gnome statues, and at the completion of the ritual the victim disappeared and the orb appeared in their place. The statue was then magically transported to this region and dumped in the woods in the hope that no one would ever find it. The miners did however find it while gathering wood and brought it inside the cave and hid it, separating the statue and the orb (found in area 18a). The pixies have played with the statue but have only been able to activate it, making it levitate and glow, as they don’t know the magic command to free its prisoner. To free the character trapped inside the orb, one must follow the instructions found in rooms 23 and 24. Once the orb is placed at the center of the statue and the dance is performed, it will light up and levitate about 5 feet above the ground. If the words are spoken, the orb will start to spin and a few moments later will explode in a large flash that blinds everyone in the room for 1d4 rounds. When they regain their sight, the PCs will see that the orb has vanished but that a person is standing in the middle of the three gnomes. This is the prisoner who was freed; they will at first appear confused, even scared. To add a bit of randomness, the GM may randomly determine which character got trapped in the Orb of Confinement. A short back story and description as well as a concise stat block is given for each one of them. When freed the character will have nothing but the clothes they are wearing, and will be briefly disoriented. If the character is the magic-user or the cleric they will have no spells ready (and of course the cleric will have no holy symbol either). Statistics given are for the character as they first appear, and must be amended if the adventurers provide them with equipment. Roll on the table below to determine who was trapped inside the Orb of Confinement. 1d6 Character Trapped Inside the Orb Kyrielle – Elven (F) Magic-User 1 Tolval – Human (M) Thief 2 Bigly – Halfling (F) Thief 2 Drohm – Dwarven (M) Fighter 1 Salga – Human (F) Cleric 1 Richmer – Human (M) Fighter 2 Kyrielle, Female Elf Magic-User Level 1: AC 11, AB +1 (-1 melee), #At 1 fist, Dam 1d3-2, Mv 40', Sv E-MU1, ML 7, XP 25 STR 5 (-2), INT 16 (+2), CHA 13 (+1) HP Kyrielle is a beautiful elven woman with long wavy blond hair and exquisite facial traits. She is versed in the arts of magic and used to live in a major elven city until she became trapped inside the orb by an evil sorceress. She is soft spoken, delicate in her manners, and acts benevolently. Her friends and family are likely still alive and her goal will be to gather a bit of gold for her trip and head back home. Tolval, Male Human Thief Level 2: AC 12, AB +2, #At 1 fist, Dam 1d3+1, Mv 40', Sv T2, ML 7, XP 25 STR 13 (+1), DEX 15 (+1), CON 14 (+1), CHA 8 (-1) HP Tolval is a troubled character. He was imprisoned inside the orb by an evil mage he owed money to. The man, in his mid thirties, is as strong as he is adroit and is recognizable as a southerner by his olive skin and dark hair. He speaks with a thick accent, is proud, and can be moody. Not necessarily evil, this man will usually act in his own interest first. Realizing most of the people he knows died a long time ago, he will want to start fresh, joining the PCs for so long as they amass riches. Bigly, Female Halfling Thief Level 2: AC 12, AB +1 (+3 missile), #At 1 fist, Dam 1d3+1, Mv 40', Sv H-T2, ML 7, XP 25 DEX 13 (+1) HP The last thing she remembers is that she attempted to rob a wizard's tower. Being a halfling, she is short and slender, with auburn hair cut short and piercing green eyes. Bigly is obsessed with looting, stealing, and exploring areas where she might find treasure. She isn’t very wise and often gets carried by her outlandish plans. Seeing that the party is composed of capable adventurers, she will follow them, hoping to gather more riches. Drohm, Male Dwarf Fighter Level 1: AC 12, AB +1 (+3 melee, +2 missile), #At 1 fist, Dam 1d3+2, Mv 40', Sv D-F1, ML 8, XP 25 STR 16 (+2), DEX 13 (+1), CON 14 (+1), CHA 6 (-1) HP Drohm fell into a trap while exploring an old temple and was carried off by minions of a wizard who confined him inside the orb. He has a long braided beard and fiery red hair. His heart is pure and he fights for glory and good. He does not wish to return to his kin but will want to explore a particular dungeon nearby when he finds out that he is in the country of Sorgwald. Salga, Female Human Cleric Level 1: AC 10, AB +1 (+0 missile), #At 1 fist, Dam 1d3, Mv 40', Sv C1, ML 8, XP 25 WIS 15 (+1), DEX 7 (-1), CON 8 (-1) HP Salga was trapped into the orb by the deity she served and worshiped after a clerical misstep. She had much time to reflect during her captivity and will be heartbroken and hurt by the abandonment of her former deity. She rarely speaks but is generally polite and generous. Salga is quite tall and attractive, with long dark hair and deep blue eyes. Although abandoned by her former deity, she is looking for a fresh start and new god to serve. Richmer: Male Human Fighter Level 2: AC 11, AB +1 (+2 melee), #At 1 fist, Dam 1d3, Mv 40', Sv F2, ML 8, XP 25 STR 15 (+1), INT 8 (-1) HP Richmer is quite a character, tall and strong with a receding hairline, missing most of his teeth, and covered in tattoos, mostly tribal. He speaks slowly, with the accent of a mountain dweller. He is friendly yet prone to aggression in response to adversity. Richmer will realize most of the people he knows are now gone from this world and will simply tag along with the party, for a share of the loot, of course.
13. Garbage Disposal room
When the PCs first walk in front of the corridor’s entrance, the text below should be read before they walk down the stairs. Peaking into the opening, you see a set of stairs, carved directly into the rock, that descend into darkness. A terrible stench emanates from the corridor. The smell reminds you of carrion and putrefaction. A strong humidity also blends with the smell, amplifying it, and the walls are covered with damp. If the PCs walk down the stairs and penetrate into the room, continue with the following description. At the end of the stairs, you find yourselves in a fairly large area, half of which is flooded. You soon realize where the stench is coming from; the area is covered with bones, decaying organic matter, and mold. The murky water is so dirty it has turned brown and all sorts of unidentifiable bits of detritus float on its surface. The smell is unbearable and you struggle to breathe. This area is used by the Black Paws to dispose of their trash. Most of it is carcasses, bodies of their victims, and food waste, but really the barklings will just throw anything in here. Bringing trash down here is quite dangerous and a few barklings were already killed and eaten by the Tentacle Worm that lairs down here. They have tried chasing it out, but have not been able to do so yet. For now, they have simply decided to feed the worm to appease it while they find a safe way to drive it out. The water slowly seeps in from a few thin orifices in the southern wall, slowly filling both this room and room 14. The flooded area is 3.5 feet deep. When the PCs first walk in, the tentacle worm will be hiding in area 14. It will take 1d4 minutes for the worm to reach room 13 if it feels vibrations in coming from there. Attacking from under the water, the worm has a 1-3 chance on a d6 of surprising the PCs, 1-4 chance if the PCs are being attacked while in the water. Tentacle Worm: AC 13, HD 3*, #At 6 tentacles, Dam paralysis, Mv 40', Sv F3, ML 9, XP 175 If the PCs search the flooded portion of the room, they will notice a small opening on the eastern side. The hole is an approximately 3 foot square opening at the bottom of the pool. There is almost no current, but the person who finds the opening gets the sense that it leads somewhere as it in fact goes to room 14.
14. Hidden Flooded Room room
Swimming in the narrow conduit, you wonder if you will find anything at the other end, hoping that you will not suffocate doing so. Your hands guide you as you are blinded by the murkiness of the water. After what seems to have been an eternity, you finally swim into a much larger area, exiting the conduit. You stand up and take a breath of fresh air; at last. Poking around, you notice you are in a small natural room that is completely flooded and completely dark. The area is entirely flooded and approximately 4 feet deep and its stalactite covered ceiling is 8 feet high. The foul smell is just as bad as it is in room 13. If for some reason the tentacle worm found in area 13 was not killed and was driven into the hole at the bottom of the water, it will be in this area, attacking as soon as characters swim into this room. At the bottom of the water, next to the eastern wall, a tiny metallic chest can be found if the PCs spend 1d2 turns searching the bottom of the pool. Due to its greenish color, the chest appears to be made of copper. Motifs of trees and flowers have been cast on the lid. It is quite corroded, but still holds and is locked. The key to open it is long gone, and the PCs will need to either pick the lock or smash it. The chest contains the following items: 1,400 cp, 1,500 sp, 300 gp, a semi-precious carnelian (50 gp), and a beautiful deep-orange topaz, as big as a human fist and finely cut to give it a round shape (500 gp).
15. The Wall Paintings room
Entering this room, you find an impressive quantity of drawings on the wall. The paintings appear to have been made with chalk or some other white pigment. They display scenes where small humanoid creatures fight and slay much bigger opponents such as wild animals or other bigger humanoids. A large red banner with a black paw sign is suspended from the ceiling in the middle of the hall. Old barrels and broken crates have been pushed back against the walls and a small brazier filled with oil provides light next to a set of stairs that go up. Two other exits connect to small corridors that fade into darkness. The wall paintings are on all sides and cover most of the room. If the PCs look at the banner, they will notice it is nailed into the rock, 9 feet above the ground. It stands in the middle of the room and is 4 feet long, and 3 feet wide. There is nothing of value or of interest in this room, but if the PCs search it, they will notice tracks of several diminutive humanoids going in all directions.
16. Resting Area room
This large room is filled with blankets and straw mats, about a dozen of them. Buckets of water can be found here and there, as well as two small wooden chests. It appears this area is where the barklings sleep or at least get some rest. A larger bunk, adorned with a thick fur blanket, sits at the other end of the room. Behind it, a large rug with beautiful motifs lines with the wall, hanging from the ceiling. The door to this area is kept closed at all times, but there is no lock. The room is therefore always accessible. There are exactly 13 straw mats in this area. All are shared among the barklings with the notable exception of Rosk’s (see area 22) bed that is reserved for his own exclusive use. This bunk is easily recognizable since it is isolated in the far end of the room (close to the secret door on the eastern wall) and covered with a thick bear fur blanket. Two chests can be found in this room. One is located on the western side of the room, among the barklings’ straw mats. It is not locked and contains tiny clothes, small boots, and wool blankets. The second chest is right next to Rosk’s bed. It is made of wood and reinforced with studded iron strips. It is locked and Rosk has the key on a chain around his neck (see area 22). The second chest contains the following: 31 sp, 10 gp, a precious malachite carved into a small frog (50 gp), and a silver goblet decorated with spiral motifs and tiny purple gems (450 gp). When the PCs first walk into the room, there will be eight barklings inside: seven regular soldiers and a stronger chieftain. Roll on the table below to determine in what situation the barklings will be encountered. If the PCs listen at the door, roll first to determine if the barklings are making noise. 1d6 Barkling situation All barklings will be asleep when the PCs first open the door, unless they walk in making excessive noise. Five barklings will be asleep while the chieftain and two soldiers will be awake, playing a game of cards, sitting in the far end of the room. All barklings will be asleep except for one regular soldier that will shout in an attempt to wake the others when he notices the PCs. Four barklings will be asleep, and four others will be awake, including the chieftain. The chieftain and three other barklings will be asleep, while four others will be playing a game of Fizzle at the center of the room. All barklings will be awake, having just woken up, armored, armed, and ready for a fight. 7 Barklings: AC 13 (leather) (11), HD ½ (1d4 hit points), #At 1 bite or 1 dagger, Dam 1d4 bite, 1d4 dagger, Mv 30' Unarmored 40', Sv NM, ML 7 (9), XP 10 ea. HP Barkling Chieftain: AC 15 (chainmail) (11), HD 2, #At 1 bite or 1 dagger, Dam 1d4+1 bite, 1d4+1 dagger, Mv 20' Unarmored 40', Sv NM, ML 7 (9), XP 75 HP When looting the bodies, the PCs will find 104 cp and 80 sp. The chieftain also wears a bronze necklace worth 10 gp, while one of the soldiers has a set of wooden die to play Fizzle (worth 5 sp). The rug hanging on the eastern wall covers the entrance to a corridor that leads to area 17. It is placed in a way that conceals the opening quite well and the PCs will have to actively look for it in order to find the secret corridor.
17. Shrine of Loov room
If the PCs are coming from the hidden corridor linking this room with room 16, read the boxed text below. Then read the second boxed text that describes the room. Approaching by the hidden corridor, you reach the other end and are faced with a curtain made out of a simple rug. Pushing it slightly to the side reveals a room beyond. Read the text below if the PCs are approaching from the southern corridor. This room is quite large, oddly shaped, but with a very high ceiling compared to the other areas in this cave. Tool marks on the walls and ceiling indicate that this area was carved out by men rather than having formed naturally. On a large makeshift stone altar at the other end of the room, you notice a large statue carved out of what seems to be a single block of dense and dark wood. The statue represents a winged wolf that also has its front left leg raised to make room for pups that drink from her breasts. All around the statue, offerings have been placed on the altar; cuts of meat, old bones, mugs of beer, and crude statuettes made out of seashells. Coins have also been offered to the statue, as well as a few gems and pieces of jewelry. Behind the statue, a gigantic banner hangs on the wall. On either side of the altar, two small braziers provide a soft light around the room. Finally, if there are still barklings in this room, and they have not noticed intruders approaching, the GM should read or paraphrase the text below. Six barklings are in here, with their backs turned to you and kneeling before the statue. They appear to be quietly meditating or praying... As mentioned in the description, this room is not natural and was dug out by the miners. A dwarf will be able to tell. The ceiling is almost fifteen feet high. This room was converted to a small shrine by the barklings. It is where they worship Loov, their goddess, the mother of all canines. Loov is a minor deity worshiped by barklings, but also other humanoid races that descended from canines. She is the goddess of canines, forests, and the Moon. Loov is often represented breastfeeding pups, being also the archetype of motherhood. Her symbol is the Three Claws Mark, often represented as three oblique lines. The statue is about three feet tall and five feet wide, and was sculpted from a single walnut trunk. A thin layer of varnish even gives it a glossy finish. Anyone versed in the arts of woodworking will recognize that this small monument is the work of a true master. The altar is a simple flat boulder that is also about three feet high and five feet wide. Around the statue, all sorts of worthless offerings have been brought by the barklings. Looking closely though will allow the PCs to find 38 sp, 26 gp, a fancy topaz (50 gp), a silver necklace with a medallion bearing the sign of Saint Bebrah (15 gp, belonged to Naerie Drekh), a gold ring set with a bloodstone (250 gp, belonged to Marbic), a bronze medal (20 gp), a fancy sapphire (150 gp), and an ivory figurine representing a shepherd holding a lamb on his shoulders (35 gp). Naerie will gladly let the PCs keep the necklace as a sign of gratitude, but Marbic will insist on recovering his ring, pretexting that it is a family heirloom very dear to him (a blatant lie). Behind the statue, the banner is very long, spanning almost eight feet in height while being approximately four feet in width. It is of a dull yellow and a large elongated black paw is drawn on it. A secret door in the northwestern wall is covered by an old rug. Merely pushing it to the side will reveal a 5-foot wide corridor. It will be hard to see it from this room, but a small window 12 feet above the ground on the southern wall connects to another area above. See room 19 for complete description. The six barklings, all unarmored, will be busy praying and easy to surprise. Unless the PCs are negligent when approaching, the GM should let the PCs attack them by surprise. The barklings will however be armed and ready to defend themselves, should they survive the initial strike. 6 Barklings: AC 11 (unarmored), HD ½ (1d4 hit points), #At 1 bite or 1 dagger, Dam 1d4 bite, 1d4 dagger, Mv 40', Sv NM, ML 7 (9), XP 10 ea. HP When looting the bodies, the PCs will find 84 copper pieces and 24 silver pieces.
18. Training Room room
Entering this room, you find yourself in a large natural area. Crude straw dummies stand in the middle of the room, having visibly suffered from multiple slashing and piercing attacks. Looking closer, you even notice bite marks on the training dummies. A bit further, a set of four makeshift practice targets line the wall. It looks like this room is some kind of barkling-sized training room. If the dogs are still in the room when the PCs first walk in here, read the following text. As you look around, you notice that three dogs are sleeping in here. They immediately stand when they notice intruders, running aggressively towards you. The dogs in this room are very aggressive and will normally attack any intruders as soon as they walk into the room, though they have a 1-2 on 1d6 chance of being surprised. These hounds are specifically trained for combat by the barklings. 3 Dogs: AC 14, HD 1+1, #At 1 bite, Dam 1d4 + hold, Mv 50', Sv F1, ML 9 (9), XP 25 ea. HP This area is where the barklings train in their spare time. Training has however been put on pause since the merchants’ shipment was pillaged, the barklings instead focusing on drinking the alcohol they stole. There is nothing of value in this room.
18a. Hidden Crystal Orb room
This area is hidden and the PCs will need to find the secret door that guards it in order to enter. The door is a strong iron panel modeled to espouse the irregular room’s wall with solid iron hinges, covered with stones precisely cut to give it a natural and unnoticeable look. The door can be opened by puling on one of the rocks slightly above the door that will release the mechanism that keeps it shut. If the PCs manage to find the hidden door in room 18, read the boxed text below. This secret room is very small. You look around and see nothing but a large basket filled with a pile of old blankets devoured by mold and dust. Placed atop the blankets, you immediately notice a large glass ball. This orb shines and, although everything else in the room appears dirty and forgotten by time, it appears to be in pristine condition. There is nothing else in this room, making you wonder what led someone to hide something like this in here. The glass sphere is called the Orb of Confinement and is about the size of a basketball. It is used in conjunction with the gnomes’ statue found in room 12. Refer to room 12 and 23 for complete details. Holding the sphere, it will appear hollow and translucent. If the PCs shake it though they will notice there is something inside, reminding them of a fine powder or sand. This powder will however be invisible. Exposing the sphere to daylight will reveal that it contains a slight blueish vapor inside of it, but will give no other indication as to what it might be. There is no way to destroy the orb unless powerful magic is used. Destroying or otherwise cracking it will turn the orb to dust and instantly kill its prisoner (see room 12).
19. Poisonous Amphora room
The door that leads to this room is closed and locked. It can be opened with a key found in room 23. Once the PCs enter the room, you can read the following text. This room is fairly small. To your left, light comes out of a small opening on the wall. Glancing around, you see a bunch of old broken crates piled up in the far corner of the room. You also notice what appears to be an amphora, lying sideways. This room looks like an abandoned storage area. Looking through the window will allow the PCs to peek into room 17. When they do so, read the text below. It looks like about fifteen feet below, there is another room, dimly lit by two small braziers. From where you stand, you can see a gigantic banner covering the wall to your right, in front of which a statue of a winged wolf stands, mounted atop a stone altar. You are unsure of what this is, but the impression you get is that this area is some kind of shrine. If there are still barklings in area 17, describe them as silent and praying to the statue, unaware of the PCs observing them from above, unless of course they make noise. The amphora in this room is the only noteworthy item. If picked up, the person holding it will notice it is sealed with a wax lid. Shaking it will produce a clinking noise, as if the receptacle was empty and a tiny object was inside. Roll on the table below to determine what it is. 1d6 Inside the amphora A single copper piece A bronze ring set with an emerald (30 gp) A small rock A small ivory statuette of a whale (5 gp) An ornamental malachite (10 gp) A semiprecious amethyst (50 gp) The amphora contains a powerful and pressurized gaseous poison. If the seal is removed or the amphora damaged in any way, it will release its gas and fill an area equal to 10 cubic feet in less than a second and linger for 1d4 turns. Anyone caught in the cloud will need to save vs. Death Ray or Poison or immediately take 2d6 points of damage. A character caught in the cloud will have to save each round they are engulfed by the gas. Breaking the amphora outside will cause the gas to immediately dissipate though anyone within 5 feet of it when the poisonous gas is first released will have to save vs. Death Ray or Poison or take 2d6 points of damage. The next round, the gas will have evaporated.
20. Hidden Shelter room
At first, it is not clear what this hidden area was originally intended for. Shelves have been carved directly into the wall, containing various objects; mugs, plates, pots, torches. It looks like everything in this room was intended for its occupants to subsist at least a couple of days. An old chair and a few blankets on the floor can be found on the other side of the room. Looking at the inside of the secret door, you notice a heavy bar that can be used to close the door. The impression you get is that this was some kind of shelter. This room is indeed a shelter. It was dug into the rock by the miners to barricade themselves in case of an attack. The shelves once contained supplies, but nothing edible remains. Almost identical to the one found to access room 18a, the door was built around the same time by the same people. Should the PCs hide in here and close the door with the bar, it will be very hard to open from the other side. This makes a good place to hide should things go sour. There is nothing of value in this room.
21. Kitchen room
A foul and repulsing smell fills the narrow hallway that leads to this area. The door is left slightly ajar. As you open it, you reveal a small kitchen. Facing you is a small oven as well as an uneven counter. At the center of the room a small table is covered with pots, plates, and suspicious meat cuts on a cutting board. The dubious smell becomes even stronger as you enter the room. Something truly disgusting appears to be cooking. This area is the kitchen. The barklings are too lazy to cook and have captured two kobolds, Krix and Blid, to be their cooks. If the kobolds are still in the kitchen when the PCs first walk into it, also read the text below. It takes you a moment to notice, but cowering behind the middle table are two kobolds, visibly terrorized to see you. They are both shackled and each holds a small rolling pin, an ineffective weapon, but a weapon nonetheless... Unfortunately for the barklings, the kobolds are not very good cooks and they will usually cook whatever prey the barklings find in the hills surrounding the cave. Roll on the table below to see what the kobolds will be cooking when the PCs first walk into the kitchen. 1d6 What’s Cooking? Lizard and cobweb stew A loaf of dirt bread covered with grated fungus and bits of fried snails Rust monster bisque Giant centipede skewers Roasted stirges seasoned with dubious spices Sautéed leeches and snakes, cooked in a mushroom sauce Facing the oven, a large wooden cupboard stands against the wall. Opening it, the PCs will find mugs, plates, and utensils. There are also three bottles of wine (2 gp each), a bottle of brandy (10 gp), and a magnum-sized bottle of sparkling white wine (10 gp). Finally, the PCs will also find a cookie jar in the cupboard. It contains eight poisonous cookies. If someone eats one of the poisonous cookies, a save vs. Death Ray or Poison will be required to avoid taking 2d8 points of damage 3d6 minutes after eating it. The kobolds have written the word "Poison" in their own script on the jar. The cookies were cooked with a poison Naerie was able to steal from Nova’s belongings while cleaning her retreat (see room 23). She plotted with the kobolds to poison the barklings in order to escape. However she needs to steal more poison to cook another batch for their plan to work. If the kobolds are asked about Naerie Drekh, they will tell the PCs she often helps them in the kitchen but is mostly used by the barklings as a waitress and a cleaner. Last they saw her, she came to grab some mugs to bring into the banquet hall (see area 22), 1d4 turns ago. Should the PCs decide to hide here and wait for her, she will be back in 2d4 turns to get the food the kobolds are cooking. 2 Kobolds: AC 11, HD ½ (1d4 hit points), #At 1 small rolling pin, Dam 1d2, Mv 30' (15' while shackled), Sv NM, ML 6, XP 10 ea. HP GM Note: The kobolds will be shackled, giving them a -2 penalty to all their attack and damage rolls if they must fight. There is a small chimney above the oven. It is small enough for a halfling or a dwarf to squeeze into it, but on the other side a 20-foot fall down a cliff awaits the player. It is almost impossible to notice from outside.
22. Feasting Area room
Entering, you realize this a large hall with three large tables arranged around an empty area. In the far end of the room, behind a table with a single ornate chair, a huge tapestry hangs on the wall. The smell of cheap ale and questionable food fills the air. The room is lit by four torches and a few candles strategically placed around the room to provide maximum coverage. This large banquet area is where Rosk, the leader of the Black Paws, will spend most of his time, eating, drinking, and being entertained by his men. If the barklings are still in this room when the PCs first enter it, read the text below. Loud noises of off-tempo music, strident howling, and guttural chanting come out of this room as you approach it. All around the room, you see a multitude of barklings sitting at the tables, while three of them stand at the center of the room, between the tables, playing music with various instruments. As you enter, all music stops and the creatures turn towards you. A huge barkling, much larger than any other you have ever seen, promptly stands, pushing the table as he does. He pulls out a morningstar and points it at you. "Take no prisoners!" he shouts as his men run towards you, barking aggressively. It will take time to notice her, but Naerie Drekh will also be cowering in the southwestern corner of the room, terrorized by the barklings. Unless it was disrupted by previous events, this is how the barklings will be encountered when the PCs first walk into this room. Three barklings will be at the center of the room, performing for their leader. One will be using a flute, another a small tambourine, and the last one will be using a halfling-sized lute. On the sides, behind each table, three barklings will be sitting. Finally, sitting alone at the large table facing the PCs entering from the east, Rosk, also known as The Duke, will be sitting alone. As soon as they notice the PCs, they will brace for combat and attack. Rosk is very tall for a barkling, standing a bit above the 5-foot mark. He is also very strong and his musculature is quite impressive. He is easily recognizable with his horned helmet, likely looted from a dead dwarf, and heavy chainmail enhanced with steel plates (treat as a normal chainmail) he wears. Instead of using the typical shortsword the barklings use, Rosk fights with a morning star (treat as a warhammer, but deals piercing damage). The Duke also wears a small golden crown, richly decorated with gems and snaky designs (worth 1,400 gp). Additionally, he wears a heavy gold chain from which a large gold pendant set with a finely cut aventurine hangs (1,000 gp). Anyone looking at these pieces of jewelry will notice they are of elven making. Finally, Rosk has a key ring attached to his belt. One of the keys opens the southern door that leads to area 10, the other unlocks the chest found in area 16, while the last one opens the padlocks that keep Naerie and the kobolds (see area 21) shackled. Rosk, "The Duke", Barkling Lord: AC 15 (chainmail), HD 3, #At 1 bite or 1 morning star, Dam 1d4+1 bite, 1d6+1 morning star, Mv 20', Sv F3, ML 7, XP 145 9 Barklings: AC 13 (leather), HD ½ (1d4 hit points), #At 1 bite or 1 dagger, Dam 1d4 bite, 1d4 dagger, Mv 30', Sv NM, ML 7 (9), XP 10 ea. HP When the PCs loot the bodies, they will find 104 cp and 102 sp. Naerie Drekh will be very relieved and thankful if the PCs manage to defeat the barklings and free her. She will understandingly be very concerned for the safety of her son held prisoner in the lair’s jail (see area 9). Unless he was already freed, the mother will put a lot of pressure on the group to help her rescue her son prior to leaving. Should the PCs decide to depart without the boy, she will stay and attempt to free him alone. If the PCs insist on her leaving with them and somehow make her comply, she will run away and get back to the lair as soon as she has an occasion to escape. Naerie is in her late twenties. She is a beautiful woman, but clearly worn by a life working in the fields of her small estate. She has long brown hair she keeps braided and rolled on top of her head, beautiful hazel eyes, and a small scar on her chin. She will be wearing the same clothes she was wearing when she was kidnapped; a dark wool dress and a leather belt fastened around her waist. The woman is not very strong, but she is courageous and determined. She will always address the PCs in a polite and calm manner, even if she becomes irritated. Naerie Drekh: AC 11, #At 1 fist, Dam 1d3, Mv 40', Sv NM, ML 7 HP Hidden behind the tapestry on the western wall is a wooden door. It is not locked, but is jammed and almost never used. It can be found normally.
23. Nova’s Retreat room
This area is interesting to say the least. A short corridor leads into a small room that contains a small straw-mat covered with clean blankets and even a few comfortable cushions. Placed against the wall, a small desk and chair indicate that this area is also some kind of study. On the desktop, books, parchments, and papers are meticulously piled. Next to the desk, a large wooden bookshelf is filled with all sorts or odd objects; small receptacles, vials, and bottles. There are also two skulls, one human-sized and another of much smaller proportions. Looking in the corner of the room, you also notice a fairly large cage that lies empty. This is where Nova, the Black Paws shaman, has her private quarters. It is forbidden for any barkling to come in here, even the Duke himself (see room 22). If visited during the day, a bit of daylight will come in from a small opening on the south western corner of the room. This opening is approximately 2 feet wide and opens on the outside, on area 1, about 20 feet above the ground. The door to the north is kept locked at all times, even when Nova is in here. If Nova is still inside the room when the PCs first walk inside, read the text below. Standing in the middle of the room, a barkling looks at you, visibly furious. It wears a long dark robe and a bizarre hat covered with feathers, beads, and other primitive ornaments. Holding a dagger menacingly, it shouts at you in a feminine voice, "Who are you? What do you want?" There is a curtain over the secret door. If moved to the side, the curtain will reveal a small wooden door. It is not locked, but Nova barred it on this side with a small wooden beam. Removing the beam and opening the door takes a full round. If the PCs bang on the doors, or otherwise make a cacophonous entry to Nova’s Retreat, she will be aware of their presence and will attempt to flee by whatever door is free, and will immediately go to room 22 to warn Rosk. If she finds Rosk defeated, she will hide and attempt to trap the PCs using her web spell. If she ever feels trapped and cornered, she will make use of her invisibility spell to flee unnoticed when either door opens. Nova, Female Barkling Magic-User Level 4: AC 11, HD 1*, #At 1 bite or 1 dagger, Dam 1d4 bite, 1d4 dagger, Mv 40’, Sv MU 3, ML 7 (9), XP 145 Spells: sleep, magic mouth, web, invisibility HP The shaman also carries a key set with four keys; one that opens the chest located in the book shelf, another that unlocks the door to the north, another that unlocks the cage, and one that opens the door to area 19. On top of Nova’s desk, the PCs can find the following items: a scroll of protection from lycanthropes, a map of the region (where the Black Paw’s Lair, Péripont, Badgerwood, and the Northern Road are clearly identified), a compass, and a small spell-book. The spell- book contains the following spells: sleep, read languages, magic missile, magic mouth, web, invisibility, mind reading. Finally, the PCs will find a crude drawing of the gnome’s statue found in area 12. Next to the drawing, a page coming from another book (not Nova’s writing) will have the following words circled in red ink. Once the statue is activated, speak the following words: "Death, I fear not. Serious, I remain. Joy, it liberates me." The shelves next to Nova’s desk are filled with rubbish, but if looking attentively, the PCs will be able to find a few interesting things: a potion of diminution, a potion of plant control, and two black vials containing poison. There is also a small chest, kept locked, that contains 124 gp, a gold comb shaped as a horse (400 gp), a semi-precious emerald (50 gp), a semi-precious opal (50 gp), and a precious malachite (100 gp). Although the cage in the corner appears to be empty, a pixie is held captive inside of it by Nova. The fey will only appear to the PCs if they manage to defeat Nova or at least lead her out of the room. Neily was captured when the Black Paws first moved in and she has been repeatedly questioned by Nova to discover the secrets of this place. The shaman has not hurt her though she has been starving the fey since she refused to answer her questions about the statue of gnomes (see area 12). The pixie has so far refused to share any information which has further angered Nova, though she thinks she will eventually get information from her. Neily is quite stubborn and at first will try to trick the PCs into freeing her, telling the PCs she knows where a great treasure hides in this cave, referring to the Sprinkler of Saint Bebrah. She will go as far as describing to them "the pretty bucket" as she calls it. The pixie will however not tell them where the item is until she is freed and fed. Once the PCs have done so, she will tell them she overheard Nova tell Rosk that the item is kept "where their great ancestors are," referring to room 10, which the pixie has never visited. If freed, the pixie will attempt to leave by the northern door, reuniting with her fellow pixies (see area 24). If the door is locked and there is no other exit, she will fly out of the small opening in the south-western corner of the room. Neily: AC 17, HD 1*, #At 1 small weapon, Dam 1d4, Mv 30' Fly 60', Sv F1 (with Elf bonuses), ML 7, XP 37 HP GM Note: Neily will be unarmed and will not be willing to fight unless forced to.
24. The Pixies Hideout room
This room is encumbered with piles of wooden crates. It seems that this was a storage room at some point, but everything in here appears to be old and abandoned. At first, this room will appear empty, as the pixies that hide herein will be wary of the PCs. If the PCs stay for more than a minute and exchange words, leading the invisible pixies to believe they are not affiliated with the barklings, they will appear to the PCs, first timidly, then flying around appearing and disappearing as they please. There are three pixies hiding in here, all part of the tribe that lived in this cave prior to the arrival of the Black Paws. The pixies came back to the cave to recover a precious artifact they stole a few months ago in the Chapel of Saint Bebrah (see The Hamlet of Péripont). Their goal is to find the Sprinkler of Saint Bebrah and to bring it to their new lair, out in the woods. The fey will all refer to the artifact as "the pretty bucket", and will describe it almost exactly as Father Grigor would. They will also be looking for their friend Neily (see room 23) whom they fear was captured during the barklings’ assault. They are however oblivious to the fact Neily is in the next room, held prisoner by Nova (see room 23). The pixies will try to strike a deal with the PCs. If they bring back the "pretty bucket" to them, the fey will in return tell them where to find "something fun and shiny". The fun and shiny thing they are referring to is the Orb of Confinement found in area 18a. The pixies know where the orb is, how to open the secret door, and how to "activate" its power (see area 12). The pixies will tell the PCs they need to perform a dance to activate the statue. The dance consists of having three people, each one imitating the emotion displayed by one of the gnomes, raise their hands in the air and dance around the statue three times while the Orb of Confinement is placed in the middle. Doing so will cause the orb to levitate, glow with a bright light, and start spinning really fast on itself. The command words (see area 23) then need to be spoken loudly and clearly as the sphere spins. The prisoner will then be freed as described in area 12. Should the PCs accept the deal, the fey will hide in here, waiting for them to return. If the PCs return the Sprinkler of Saint Bebrah to them, the pixies will tell them to look on the southern wall of area 18, leading to an automatic success to find the door and open it. They will then leave the cave by area 24a. The three pixies are called Filly (M), Bini (M), and Seulia (F). Filly is very shy and will not speak unless directly engaged by the PCs. Bini is very playful and loves telling jokes and lying. He will take the lead when talking to PCs. Seulia is suspicious and will not trust the PCs until they return with the Sprinkler of Saint Bebrah. Stats for the pixies are given below. 3 Pixies: AC 17, HD 1*, #At 1 small dagger, Dam 1d4, Mv 30' Fly 60', Sv F1 (with Elf bonuses), ML 7, XP 37 ea. HP
24a. Cliff Side Entrance room
If the entrance is looked at from area 1, then read the boxed text below. As you look around the cliff, you realize there is a large hole in the rock, about 15 feet above the ground. The opening is quite large and an adroit character can probably climb up to that entrance. The entrance is 15 feet above the ground and is 5 feet wide and about 7 feet high. It opens on a small hallway that reaches area 24. Though it should not be too hard for a Thief to climb up to it, doing so will prove to be difficult for other classes. Climbing up with a rope, however, is feasible and a character with average strength and dexterity will take 1d3 minutes to do so. If instead the PCs arrive at area 24a via area 24, then read the text below. You walk into an irregular hallway seeing daylight pouring into it from the far end. Reaching the end of the tunnel, you arrive at what seems to be a cliff-side. Looking outside, you recognize the area by which you first arrived at the cave. Note to GM: If it is night time, replace daylight with moonlight.
NPCs HERE • 0
Add via World pageNo NPCs yet. Use + Add NPC on World Vault and assign to this location.
MAP & PINS • 0
Tap the map to drop a pin — drag pins to move them.
Tip: click anywhere on the map above — the form appears here with coordinates filled in.