← World Vault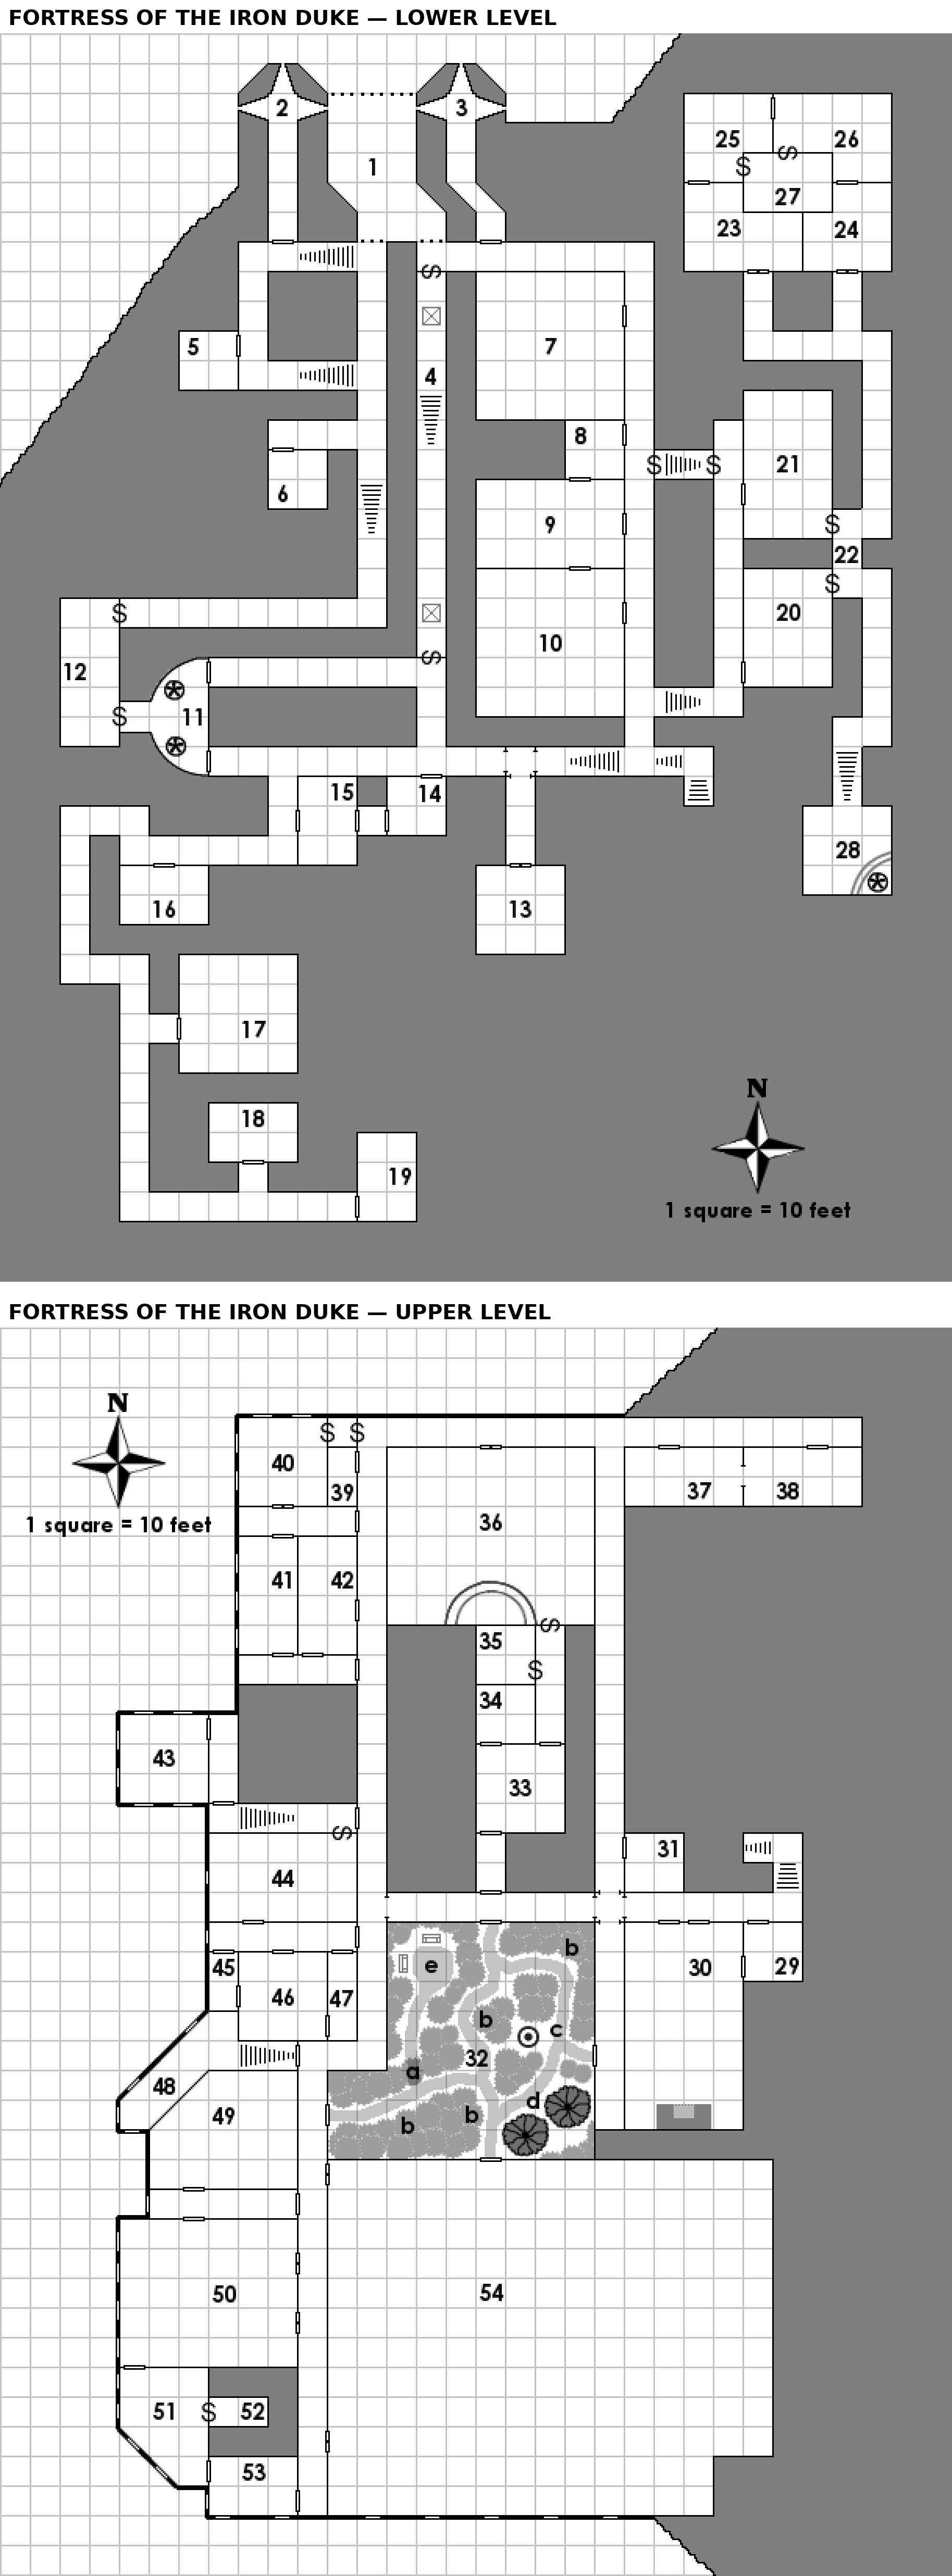
dungeon
Fortress of the Iron Duke
bf2-fortress • bf2-fortress • BF2: Fortress of the Iron Duke
The fortress of Duke Vadarin, the Iron Duke, in the valley of Freestead (northeastern Enterone, Glain), for characters of level 2-4. Player's Background The DM should read or paraphrase the boxed text below to the players to start the adventure. The account given is told by a refugee from the valley. Everyone knows the story of Freestead... how the small mountain barony was nearly overrun by humanoids in an incursion twelve years ago, when Baron Vadarin the Strong moved swiftly, forging an alliance with the dwarven delve in the nearby mountains and forming a combined force of men and dwarves to rid the valley of the humanoid menace. Vadarin was thus appointed by the Regency Council to replace the ineffectual Duke Margrave, who by neglect had allowed the duchy's defenses to become weak. With the coming of peace and security, new settlers began to arrive, and soon the whole duchy was again prosperous. The people of the duchy called their leader the Iron Duke, and he ruled them with a firm but fair hand. A bit more than a month ago, the dwarven miners discovered a giant emerald, said to be the size of a man's fist and completely flawless (which is unheard of even by dwarves). Calling it "Freestead's Glory," they presented it to the Duke. He was so pleased with the gift that he decreed a special celebration to be held at month's end. As preparations were being made for the celebration, a beautiful adventuress arrived in the kingdom, riding an ice dragon. Her name was Lady Kylenne
Wandering Monsters (roll every three turns; encounters appear on 1 on 1d6; GM may roll 1d12 or choose; this one table applies to both levels of the fortress, PDF p. 9): 1-2: 1d6 Goblins -- AC 14 (11), HD 1-1, #At 1 spear, Dam 1d6, Mv 20' (Unarmored 30'), Sv F1, ML 7, XP 10 ea. 3-4: 1d6 Hobgoblins -- AC 14 (11), HD 1, #At 1 longsword, Dam 1d8, Mv 30' (Unarmored 40'), Sv F1, ML 8, XP 25 ea. 5-6: 1d6 Orcs -- AC 14 (11), HD 1, #At 1 scimitar, Dam 1d8, Mv 40', Sv F1, ML 8, XP 25 ea. 7-9: 1d6 Giant Rats (glowing green eyes; changed from normal rats by Khaadk's power) -- AC 13, HD 1/2 (1d4 HP), #At 1 bite, Dam 1d4 + disease, Mv 40' Swim 20', Sv F1, ML 8, XP 10 ea. 10: 1d4 Bugbears -- AC 15, HD 3+1, #At 1 scimitar, Dam 1d8+1, Mv 30', Sv F3, ML 9, XP 145 ea. 11: 1d4 Kobolds -- AC 13 (11), HD 1/2 (1d4 HP), #At 1 long knife, Dam 1d4, Mv 20' (Unarmored 30'), Sv NM, ML 6, XP 10 ea. 12: NPC Party (Ezan Thane, Melana Aurelius, Faylun, Carborius).
Maps: Lower and Upper Level extracted from the BF2 PDF (pp.26–27), stacked Lower above Upper.
CHILDREN • 59
1. Entrance room
The entrance to the fortress is carved into the side of the mountain itself. It's about thirty feet wide and perhaps forty feet deep, closed by a single large portcullis on the outside and two smaller ones inside. The green glow covers the outer bars. You notice that something really strong has bent the outer bars enough that you may enter one at a time, if you dare to brave the green glow. The green glow, which blankets the entire fortress, does no harm to those passing through it from the outside in (though it will make those entering feel as if insects were crawling over their skin). However, anyone attempting to leave will be prevented from doing so (by a force field) and further will suffer 1d4 damage on each attempt. Assuming that the party enters (and this will be a short adventure if they don't), read the following: The entry hall is empty, save for dead leaves and a couple of stains that look suspiciously like blood. There are two portcullises ahead of you, one to the right and one to the left, with hallways visible beyond. Opening either portcullis can be done with a roll of 1 on 1d20, again adjusting for Strength bonus; if two characters work together, add their Strength bonuses (i.e. +1 and +2 would be a total of +3, for a range of 1-4 on 1d20). The portcullises can also be opened by the levers in the east and west rooms.
2. West Room room
You see an armored guard wearing the livery of the Duke sitting on a bench beside two large levers protruding from the wall to the right, just before the first arrow slit. As you open the door, he raises his eyes to you, and you see a dagger hilt protruding from his right eye socket. He grins horribly and stands, slowly lifting his sword. This room is empty save for the zombie (the former gate guard) and the bench and lever, as described. One lever is marked "A" and one is marked "B". Lowering both levers marked "B" (that is, the one in this room and the one in room 3) will open the two inner portcullises. Lowering both levers marked "A" results in a loud squealing noise for a few rounds (these levers should open the outer portcullis, but the mechanism is jammed). Zombie: AC 12 (half damage from blunt weapons, 1 point only from arrows, bolts, or sling stones), HD 2, #At 1, Dam 1d8, Mv 20', Sv F2, ML 12, XP 75 HP
3. East Room room
Lying on the floor of this room is the dead body of one of the Duke's guards, being eaten by giant rats! After the fight has been resolved, read the following to any survivors: Now that you have a chance to look around, you see a bench against the left wall just before the first arrow slit. Two large levers protrude from the wall above it. One lever is marked "A" and one is marked "B". Lowering both levers marked "B" (that is, the one in this room and the one in room 2) will open the two inner portcullises. Lowering both levers marked "A" results in a loud squealing noise for a few rounds (these levers should open the outer portcullis, but the mechanism is jammed). 3 Giant Rats: AC 13, HD ½ (1d4 HP), #At 1 bite, Dam 1d4 + disease, Mv 40', Sv F1, ML 8, XP 10 ea. HP
4. Secret Hallway room
This hallway runs from one obvious secret door (obvious from the inside) to another. Each is opened from the outside by pressing a "loose" stone, or from the inside by turning a handle, and each has a tiny peephole that can be used from the inside to see the hallway outside. Another "loose stone" (detected as a secret door) in the east side wall near each secret door may be pressed to disable both pit traps. Otherwise, each pit opens when at least 200 pounds of weight is placed upon it, dropping those on the trap door 20' to a hard floor below. Each character who might have been on a trapdoor when it opened gets a save vs. Death Ray to avoid falling; the DM may allow the players to add any Dexterity bonus when making this roll, but if this is done any Dexterity penalties should also apply. Note again that the disarming devices for the pits affect both pits at the same time. This hallway represents a "rabbit hole" down which defenders may flee, so disarming one pit automatically disarms the other. Each pit resets itself after 5 rounds, as does the disarming device.
5. Green Jelly room
This room appears to be some sort of storeroom. A number of smashed crates and barrels may be seen. There is also a shiny green puddle of liquid on the floor near the wreckage. Green Jelly: AC 12 (only hit by fire or cold), HD 2**, #At 1 dissolve, Dam must be scraped off or killed in first round or full disintegration in 6+1d4 rounds, Mv 1', Sv F2, ML 12, XP 125
6. Storeroom room
This room appears to be a storeroom for ammunition. Crates marked "Arrows, Shortbow," "Arrows, Longbow," "Bolts, Heavy," and "Bolts, Light" are piled up against the side and back walls. Just inside the room, beside the door, is a mop, a scrub brush, and a wooden bucket. The crates have all been opened, and are not more than a quarter full. They contain a total of 120 shortbow arrows, 85 longbow arrows, 220 heavy crossbow bolts, and 175 light crossbow bolts.
7. Warrior Training Room room
This room appears to have been used for warrior training; weapon racks line the walls, and a variety of large mats are visible on the floor. In the far left-hand corner someone has piled up weapon racks and benches to form a sort of barricade, and you think you see eyes looking out at you from behind it. There are several kobolds here, survivors of a tribe decimated by the Duke's men. They were drawn to the fortress by Khaadk's call, but now are fearful of all the larger, tougher monsters in the dungeon. The kobolds won't attack those who enter the room right away; rather they will wait until someone approaches the barricade within 20', at which time they will throw their daggers and then draw their shortswords. 3 Kobolds: AC 13, HD ½ (1d4 HP), #At 1 dagger or 1 shortsword, Dam 1d4 dagger, 1d6-1 shortsword, Mv 20', Sv NM, ML 7 (6 without leaders), XP 10 ea. HP 2 Kobold Warriors: AC 14, HD 1, #At 1 dagger or 1 shortsword, Dam 1d4 dagger, 1d6 shortsword, Mv 20', Sv F1, ML 8, XP 25 ea. HP Kobold Chieftain: AC 15, HD 2, #At 1 dagger or 1 shortsword, Dam 1d4 dagger, 1d6+1 shortsword, Mv 20', Sv F2, ML 8, XP 75 HP
8. Pantry room
Five small, ugly humanoids are in this cluttered room, apparently eating preserved meats and fruits from jars they have broken open. They look at you with obvious malice... This is a small raiding party of goblins drawn in by Khaadk's call. They just arrived, and don't know anything. A fight will surely ensue; don't forget to check for surprise on both sides. After the battle is over, read the following to the survivors: This room appears to be a pantry; shelves line the walls and are loaded down with various foodstuffs. 5 Goblins: AC 14, HD 1-1, #At 1 shortsword, Dam 1d6, Mv 20', Sv F1, ML 7, XP 10 ea. HP
9. Kitchen room
You are pretty sure this was the kitchen. Amazingly lifelike statues of one male and two female cooks are posed as if preparing a meal; foodstuffs, apparently real, are arranged appropriately. The stoves and ovens appear cold, however, and the food shows signs of having been gnawed on by rats or other vermin. The statues were, of course, the real cooking staff, turned to stone by Khaadk's magic. A spitting cobra is in the room, having followed the trail of several rats here. It hides beneath one of the tables; a thorough search will almost certainly disturb it, but if it can flee without a fight it will do so. Spitting Cobra: HD 1*, #At 1 bite or 1 spit, Dam 1d4 + poison bite, save vs. Poison or be blinded spit, Mv 30', Sv F1, ML 7, XP 37 HP
10. Dining Hall room
This appears to be a dining room. A large table dominates the room, and arrayed around it are statues of noble men and women apparently eating dinner. There is real food on the table, though it appears to have been spoiled by vermin. You notice that there are several seats left empty, including the seat at the head of the table as well as the seat to the right of the head. Various NPCs mentioned elsewhere in this module may be found among these statues, including Stephan DeSant, the Duke's wizard. A tentacle worm is hiding beneath the table. It will try to surprise any living creatures which enter the room. Tentacle Worm: AC 13, HD 3*, #At 6 tentacles, Dam Paralysis, Mv 40', Sv F3, ML 9, XP 175
11. Anteroom room
This strangely-shaped room is empty save for a mosaic-tiled alcove containing a pair of crystalline statues. The statues are animated, of course. 2 Living Crystal Statues: AC 16, HD 3, #At 2 fists, Dam 1d6 fist, Mv 30', Sv F3, ML 12, XP 145 ea. HP
12. Fountain Room room
This room contains a small fountain centered along the west wall. To the left and right of the fountain hang tapestries; the one on the right depicts Duke Vadarin, sitting on his throne in his full ducal regalia holding a large emerald in his right hand. He appears to be regarding it thoughtfully. The other depicts a woman in silver plate mail armor riding an ice dragon; Kylenne the Courageous, no doubt. Other than the things described above, the room is empty. The fountain is entirely ordinary, and contains cold, clean water fit for drinking.
13. Barracks room
This room appears to be a barracks. Beds and lockers line the walls to the left and right; all are in perfect order except for the last one on the left. Hiding behind the last bed on the left is one of the Duke's guards, Jaref, who has been driven insane by Khaadk's magic. He will attack if approached; if the party leaves without investigating his unmade bed, he will try to sneak up behind them (though he is hardly a thief and is wearing platemail armor). Jaref is armed with a longsword. Jaref the Mad, Human Male Fighter Level 1: AC 17, AB +1, #At 1 longsword, Dam 1d8+1, Mv 20', Sv F1, ML 11, XP 25 HP
14. Schoolroom room
Lined up in this room are several narrow desks with benches behind them, all facing the east wall. The east wall has a broad desk flanked by several easels with displays on them. A small case of books is in the northwest corner. A small table in the southeast corner holds a planetary globe and several lead statues of creatures. The lead statues include a dragon, a troll, and a whale. The papers on the easels include a simple map of the local region, a chart of local noble family trees, and a display of coats of arms. On the main teacher's desk are several six- sided dice with spots atop a sheet of paper titled "RANDOM NUMBERS" containing a simple discourse on die rolls and random numbers. The appointments of this room are simple but high quality: luxurious hard woods with decorative scrolling for the benches and tables, for example.
15. Library room
This room is a small library, containing a single library table and bookshelves lining the walls. The books are all common educational works; none appear to be magical in nature. A giant crab spider is hanging from the ceiling above the west door to the room. It will attempt to attack with surprise as soon as any characters enter the room. Giant Crab Spider: AC 13, HD 2*, #At 1 bite, Dam 1d8 + poison, Mv 40', Sv F2, ML 7, XP 100 HP
16. Fitting Room room
This room has a tile floor covered with a large rug. The walls of the room are covered with filmy translucent fabric that moves with the slight breeze caused by opening the door. In the middle of the room is a curtain made of the same fabric; through the translucent fabric you can see a manlike figure that appears to have no head! The figure is a dressmaker's dummy, which is "wearing" the wedding dress made for Lady Kylenne. When the player characters finally discover this, they will likely be relieved. 1d4 rounds later, the wedding dress will rise up from the dummy and attack! Enchanted Wedding Dress: AC 11, HD ½ (1d4 HP), #At 1, Dam 1d2, Mv Fly 40', Sv M5, ML 12, XP 10 HP
17. Butcher room
This room appears to belong to a butcher; indeed, an incredibly lifelike statue of one holding a carving knife and a slab of meat with a bite taken out of it stands next to a table. You observe that many other meats lie around the shelves and on the floor, and most have been eaten to some degree. Seconds later, abnormally huge rats with a green aura surrounding them skitter out from under the table, baring their wickedly sharp fangs. The rats were just ordinary-sized rats when Khaadk's power overtook the fortress, enlarging them and petrifying the butcher. They have since scattered about the castle, but eight remain here. 8 Giant Rats: AC 13, HD ½ (1d4 HP), #At 1 bite, Dam 1d4 + disease, Mv 40', Sv F1, ML 8, XP 10 ea. HP
18. Sculptor's Workroom room
The walls and floor of this room are covered in heavy canvas. In the middle of the room are two statues, one of a large, bald man wearing only trousers and boots, the other of a beautiful woman wearing platemail armor. The statue of the man faces away from you; you can see that it holds a hammer in its right hand and a chisel in its left. On the floor, stone chips are scattered around randomly, and a pile of chips has been swept into the far corner. There is a table in another corner with papers scattered on it; some of the papers have fallen to the floor. The statue of the bald man is the famous sculptor Lirekos, who was turned to stone just as he finished carving a statue of Lady Kylenne. The statue of Kylenne is less realistic than the "statue" of Lirekos, which the player characters will notice if they study them. The papers on the table are sketches of Lady Kylenne; if the PCs look they will find a charcoal drawing stick on the table also. There are no monsters or treasure here.
19. Skeleton Closet room
If any character approaches within 10' of the door to this room, read the following: As you approach the door, it suddenly flies open and skeletons armed with picks rush out to attack! The skeletons surprise on 1-4 on 1d6 due to the suddenness of the attack. 10 Skeletons: AC 13 (half damage from edged or piercing weapons, 1 point only from arrows, bolts, or sling stones), HD 1, #At 1 pick, Dam 1d6, Mv 40', Sv F1, ML 12, XP 25 ea. HP
20. Barracks room
Rows of wooden framed bunks line this room, three beds high, two bunks per ten foot section. Under each set of bunks are three wooden boxes. The northeast corner is clear of bunks and has a table and five chairs. Moving among the bunks, rifling through the boxes, are seven man-sized humanoids. The humanoids are hobgoblins ready for a fight. 7 Hobgoblins: AC 14, HD 1, #At 1 longsword, Dam 1d8, Mv 30', Sv F1, ML 8, XP 25 ea. HP Behind the partition are two beds, a table and desk, and two chairs. The wooden boxes contain clothing and personal effects for the soldiers. Nothing of value will be found within.
21. Barracks room
Rows of wooden-framed bunks line this room, three beds high, two bunks per ten foot section. Under each set of bunks are three wooden boxes. The southeast corner is clear of bunks and has a table and five chairs, while the northeastern corner is partitioned by a wooden wall that stops a foot short of the ceiling and has a three foot wide opening facing north. Trussed up on two of the bunks are female figures in summer dresses, gagged and pleading with their faces for rescue. The two figures are not damsels in distress, but rather thieves. One, Garalia, is a petite blond who is also a master at knot tying and has trussed them both up to make it look like they are captured. If left to their own, eventually she'll wiggle free as if by accident. The brunette, Sasha, is a bit rotund. She acts all blubbery but is sharp as a dagger. If rescued they blabber about how "the hobgoblins" caught them and were planning to do who-knows-what with them. They claim to be nothing special, just young ladies who were going to attend the wedding. Both ladies refuse to wear armor or use weapons, and if forced to will act clumsy. However, given an opportunity they will steal weapons, take anything valuable they can easily carry, and disappear. Their equipment is stashed in two of the boxes under the bunks (but not the ones they are trussed up on): leather armor, short swords and daggers. On or under the table in the corner partitioned off for officers is a week of rations, a lantern, two flasks of o
22. Secret Hallway room
The secret doors from rooms 20 and 21 are plainly visible from the hallway side, and in fact have obvious handles to open them.
23. Steam Room room
The walls of this room are lined with stone benches. A large brazier occupies the center of the room, and an empty bucket rests on the floor near the south doors. The walls and floor of this room are tiled; the tiles on the wall form a mosaic depicting clouds in the sky. A large section of the wall tiles have been removed from the west wall and are lying on the floor in a heap. Duke Vadarin has ordered the tiles changed to depict a dragon flying in the clouds, but the work has only just begun. The artist, Cauliff, is in room 25 below. There are no monsters or treasure in this room.
24. Towel Room room
Many white linen towels hang from racks on the east wall of this room. Against the west wall you see a large washtub and a white statue of a woman leaning over it. She's dressed in the clothes of a servant. There are no monsters or treasure in this room.
25. Mosaic Room room
This room is a mess. Stacks of colored glass shards lie on woolen rags beside several wooden buckets of a gray pasty material, mortar or plaster perhaps. A man is on his knees facing the north wall, rocking back and forth. As soon as you enter he glances back at you, showing a worried, dirty face with a scraggly beard. Then he turns back to the wall, saying absentmindedly, "I had to move the duke over, but did I leave enough room for her?" The man is named Cauliff, and he's an artist hired to redo the mosaics in this room. The wall he is facing once had a full-length mosaic but now most of it is bare, with patchy remnants of plaster and mortar on it. A well- executed image of the duke is at the east end, right hand stretched out as if reaching for another's hand. Empty spaces around it show that it was moved and not fully completed yet. If approached, the man is quite crazy. It is useless to talk with him unless he is cured of madness (which will happen if the threat of Khaadk is eliminated as described in the GM's Information section, page 2). If left alone, the man picks up a trowel and spreads mortar on a section of wall, then begins putting pieces on the wall. "She's a pretty woman, isn't she?" he mutters. As he works he carefully constructs the image of a huge green gem. Then he blinks, says, "That's not her! Who did that?" Peeling the pieces off the wall, he slumps to the floor on his knees, rocking, and muttering, "I had to move the duke over. Do I have enough space fo
26. Sunken Bath room
A large sunken bath occupies much of the northern end of this room, from which steam rises invitingly. Several stone benches with marble tops are in the southeast area. The bath is full of steaming hot water. The room is brightly lit by a continual light spell cast on a lantern hanging on an ornate brass hook overhead.
27. Yellow Pedestal room
This room is entirely empty, save for an irregular yellow pillar in the center of the room. The pillar is about four feet tall and about two feet in diameter at the base, tapering to about a foot in diameter at the top. It is lumpy and shiny, as if made of candle wax. If examined closely, read the following: Embedded in the top of the pillar is a smooth, glossy white stone, an opal perhaps. If the stone is touched, it will be found to be an illusion. After 2d4 rounds that character will see a floating eyeball hovering nearby, watching. The eyeball is an illusion; treat it as having an AC of 22 if attacked. A successful strike against the eyeball causes it to disappear. Only the character who touched the stone will be able to see the eyeball, and if more than one character touches it, each will get his or her own illusionary eyeball. If unmolested, any illusionary eyeballs will follow their victims, apparently watching, until Khaadk is contained or freed. The eyes do not actually see anything (i.e. they are not any sort of scrying device); they are just here to be creepy.
28. Cavern Temple room
The walls of this room are covered with murals depicting pastoral scenes. Standing on a dais in the southeast corner of the room is a statue which appears to be of En-Teare, god of wisdom. The head of the statue has been smashed, but you recognize the god by the book and quill he holds in his hands. A nest of giant centipedes has built a nest behind the statue; they will attack anyone who approaches, surprising on 1-3 on 1d6. 8 Giant Centipedes: AC 11, HD ½ (1d4 HP), #At 1 bite, Dam Poison (save at +2), Mv 40', Sv NM, ML 7, XP 13 ea. HP
29. Washroom room
This room is brightly lit by continual light spells cast on orbs hanging from the ceiling. Wash basins line the south wall behind which a mirror is centered. A small table and two padded chairs occupy the space on the north wall. A pile of towels, a shaving razor, soap, combs, brushes, pretty toiletry bottles, and other similar items litter the table. In one chair sits the statue of a barber, with a surprised expression on its face. Other than the items described above, this room is empty.
30. Great Hall room
This room is filled with round tables and chairs. Each table and chair set is in a slightly different style, and each has an area rug underneath it; each rug is also unique, some being rectangular and others circular, and each having a distinct pattern. At the far end of the room is a large fireplace, with a fire blazing within it; that end of the room seems to be illuminated by magic, while the near end has no light of its own. Sitting around a table near the fireplace is an unlikely group: three women, two men, and three ugly, piglike humanoids. One of the men is standing with a wineglass held out, and one of the humanoids is filling it from a wine bottle, while the other humanoids are drinking from their own glasses. In fact, the humans in the room are petrified; the man standing was holding forth on some subject or another when Khaadk's magic was released. The orcs are drinking the wine left on the table and making fun of the victims, but when they notice the adventurers they'll pick up their spears and attack. The orcs have an uneasy truce with the urgoblin in room 31, below, but if the urgoblin hears them fighting adventurers, he'll try to sneak up behind them and attack, fighting on the orc's side for as long as the adventurers last (or until the orcs fail a morale check). 3 Orcs: AC 14, HD 1, #At 1 spear, Dam 1d6, Mv 40', Sv F1, ML 8, XP 25 ea. HP
31. Lounge room
In this room you see a large, ugly humanoid sitting in an easy chair, apparently asleep, with a longsword laying across its lap. The humanoid is an urgoblin; remember that they look just like hobgoblins, so if the adventurers have met hobgoblins before they will almost certainly think they are facing one. And it's not really asleep. The chair is in the far corner of the room, and a large circular rug covers the floor of the middle of the room. As soon as any adventurer is on the rug, the urgoblin will grab it and pull; it is very strong, so even if there are several adventurers on the rug, it can probably still pull the rug out from under them. Those who have the rug pulled from under them must save vs. Death Ray (with Dexterity bonus applied) or fall down; no damage is done, but those who fall cannot fight in the first round, and the urgoblin gets a bonus of +2 to hit any character who has fallen. After pulling the rug, the urgoblin will begin to fight with its sword; if the orcs in room 30 have not been encountered yet, they will hear the fight immediately and will join the fight two rounds later (on the urgoblin's side, though they are not friendly otherwise). Urgoblin: AC 14, HD 2*, #At 1 weapon, Dam 1d8, Mv 30', Sv F2, ML 9, XP 100
32. Garden room
You see before you a garden open to the sky, overgrown and unkempt looking. You can see the green glow above you, barring your exit in that direction. A narrow pathway of rounded river rock leads away into the overgrowth. The "bushy" areas on the map represent various wildly-growing flowering plants. Many are thorny, and all are very dense, making movement through them slow and difficult. There are several encounter areas in this room, marked with letters:
32a. Hidden Pathway room
There is an overgrown pathway here leading to area 32e. Treat it as a secret door for purposes of discovery, but award a +1 bonus to detection rolls. Normal characters detect the pathway at a glance on 1 on 1d6, or on a search on 1-2 on 1d6. Elves apply their normal +1 bonus on top of this, detecting at a glance on 1-2 on 1d6 or on a search on 1-3 on 1d6.
32b. Blood Rose room
Each of the locations on the map labeled "b" is occupied by a blood rose, and all are white (i.e. thirsty). There are four total. Note the narcotic effect of the scent of the blood rose... any character approaching one must save vs. Poison or become befuddled, dropping anything carried and submitting to the blood rose. 4 Blood Roses: AC 13, HD 3*, #At 2 canes + blood drain, Dam 1d6 cane, 1d6/round blood drain, Mv 1', Sv F2, ML 12, XP 175 ea.
32c. Fountain room
Upon first sight you see what looks like a statue of the duke standing in ceremonial armor with one arm raising a sword to the heavens, his face triumphant. Moving closer the player characters see that the man looks similar to the duke, but older and slightly different in appearance from the duke, while standing shyly at his left side is a young boy who looks very much like the duke. This is a memorial to the duke's father. The statue is on a heavily decorated column two feet high over a wide basin of water. Small holes ring the base of the column and every turn (on the turn) water fountains up for a few rounds.
32d. Hangman Trees room
At this location there are a pair of hangman trees. They will attack anyone who comes within reach. 2 Hangman Trees: AC 16, HD 5, #At 4 limbs + strangle, Dam 1d6 limb, 1d6/round strangle, Mv 0’, Sv F4, ML 12, XP 360 ea.
32e. Lover's Retreat room
Two ornate marble benches grace this elegant, secluded grove. Seated on one bench you see statues of a young man and a young woman, kissing. There are no monsters or treasure here.
33. Sitting Room room
The NPC party is using this room and the next as a base of operations. See the "NPC Party" section for details. The description below omits the NPCs; the GM should add them to the description if they are present when the party enters. This room has a large, fancy rectangular rug in the center of the floor. Arranged on opposite sides of the rug are a pair of high- backed, padded benches; they are set out from the wall far enough to allow people to walk behind them. Small side tables are positioned at each end of each of the benches. A writing desk with a padded chair occupies the southeast corner of the room. The room is illuminated by two elaborately- detailed lanterns hanging from hooks on each of the side walls. Other than any gear left behind by the NPC party, this room is empty. Like most of the other lanterns in this dungeon, the lanterns in this room are illuminated by continual light spells. Carborius and Ezan Thane bunk here, sleeping on the benches; any men-at-arms in service to Melana also sleep here, on the floor.
34. Bedroom room
The NPC party is using this room, and room 33, above, as a base of operations. See the "NPC Party" section for details. The description below omits the NPCs; the GM should add them to the description if they are present when the party enters. This room is obviously a bedroom. It is simply furnished and neat, but the furnishings are all of very high quality. A large bed is centered on the north wall, with a large chest at the foot. An armoire stands in each of the north corners. A washstand occupies the southeast corner. The room is illuminated by a fancy lantern placed on a side table beside the head of the bed. Melana bunks here. If surprised, she may be found with one of her men-at-arms or with Ezan Thane, in flagrante delicto. This was Kylenne's room. The northwest armoire contains her clothing, while the other one is empty. The chest contains additional bedclothes; folded up in a blanket at the bottom of the chest is a set of thieves' tools and a Dagger +1. The lanterns are illuminated by continual light spells.
35. Vault room
In this room you see statues of a man and woman, facing each other. Both are dressed in fine clothing, the sort which would be appropriate to wear to a noble's wedding feast. The man is near you, facing away, while the woman is on the far side of the room, facing you; she is bent forward with a look of loss on her face. On the floor between them lies a huge, glowing emerald. The jewel has a crack in it, and from the crack a glowing greenish mist is streaming like the smoke from a candle. Behind the female statue are several chests of various sizes, piled against the wall. One is open, and within it you see sacks that appear to be bulging with coins. The statues are the petrified forms of Duke Vadarin and Kylenne, of course. If any character inspects Vadarin's stony form, he will be seen to be scowling in angry surprise. Three rounds after the first adventurer enters the room, they will hear a voice: Suddenly the emerald begins to glow more strongly, and you hear a haughty voice: "At last you have come! Free me and I will reward you! Free me, I beg you! The voice is Khaadk, and freeing him would be a mistake. See the GM's Information section, page 2, for details of the consequences. The treasure in the room is the property of Duke Vadarin, of course; anyone taking treasure from this room will likely be treated as a criminal if Duke Vadarin is restored. The Duke's Treasure: Small Chest (open): Small sack containing 200 gp, one necklace worth 3,000 gp, one necklace worth 1,000 g
36. Throne Room room
This spacious room is broad, clean, and ablaze with light and color. The ceiling is thirty feet high, supported by grand arches. Colored skylights along the rim of the ceiling allow light to glare down during the day. Tapestries line the walls, along with ornate candelabras blazing with candles that look freshly-lit. The floor is colorful flecked marble: greens along the walkway from entrance to dais, and white-flecked reds elsewhere. Two ornate thrones sit facing north on the dais, flanked by a lesser one on each side. Left and right of the dais are single tall human statues with pole arms with pinions. Two rows of four short, ornate statues line the way from the door to the thrones, with a ninth standing in front of one at the entranceway. The statues are of dwarves dressed up in ornate court clothing, complete with swords and helms, and practicing a salute. The ninth one was the leader and was inspecting the jacket button of one when they were caught by the first wave of magic and turned to stone. One of the human statues with the pole arms is positioned to at least partially block the secret door. The secret door swings open to the north, and the statue blocks it from being opened such that only one person can exit at a time. The candles in the candelabra are artistic fakes that are not removable; they glow due to a continual light effect.
37. Guard Room room
Unlike many of the rooms in this dungeon, this room presently has no illumination. The GM must remember this when describing the room. This is obviously a guard room. An open archway is centered in the east wall. An entirely empty weapon rack occupies the eastern twenty feet of the north wall; it appears to have been constructed to hold longswords, shortswords, pole arms, and bows. A table surrounded by six chairs is in the southwest corner. A desk is positioned on the east side of the room, near the south wall. A man is seated behind the desk, bent over with his head lying on his arms. His clothes are very ragged looking. The "man" behind the desk is a wight. It will stand up and attack if approached. Wight: AC 15 (s), HD 3*, #At 1, Dam energy drain, Mv 30', Sv F3, ML 12, XP 175
38. Ale Room room
Unlike many of the rooms in this dungeon, this room presently has no illumination. The GM must remember this when describing the room. This room is mostly empty, but lining the east wall are several shelves loaded with ale kegs. A large open archway is centered in the west wall. Other than the barrels of ale, there is nothing of value in this room.
39. Guard Station room
In this small room there are four statues of soldiers in chainmail armor, seated around a table at which they are, apparently, playing cards. Each statue has a small pile of coins in front of him, and in the center of the table is a larger pile of coins. You notice that one of the statues seems to have a card tucked into his boot. The cards in the hands of the statues are brittle white stone, but the cards on the table are stiff paper; the table is an ordinary wooden table, and the chairs are likewise quite normal. There is a total of 72 sp and 13 gp on the table. The room is illuminated by continual light, cast in the air.
40. Duke's Bedroom room
This room is obviously a bedroom. It is simply furnished and neat, but the furnishings are all of very high quality. A large bed is centered on the north wall, with a large chest at the foot. An armoire stands in each of the western corners. A washstand occupies the southeast corner. The room is illuminated by two fancy lanterns hanging from hooks in the ceiling, one over the bed and the other over the washstand. The armoires contain the Duke's clothing, with his fancier garb in the northwest armoire and everyday clothing in the northeast armoire. The chest contains additional bedclothes; it has a false bottom, detected as a secret door, under which is a shortsword +1 and a pouch containing 50 pp. The lanterns are illuminated by continual light spells. Secret Exit: On the east wall near the north end is a secret door 3 feet wide and 6 feet high, well hidden and thus hard to detect from either side. This thick door is secured with bars that retract when it is unlocked. Pressing a well-hidden two-inch square section of wall to the left of it will cause the locking bars to retract, and then the door will open easily. Thus, unless magic is used, or the door is broken down (a difficult and noisy proposition), this secret door requires two separate rolls before it can be opened: one to find the door, and another to discover the latch mechanism. The secret door that opens into the main hall is just as well hidden from the outside (eastern face), but there is an obvious switch on the
41. Sitting Room room
The first thing you notice about this room is the sound of music... though you can't identify the source, you can plainly hear stringed instruments playing a stately march. This room is furnished as a sitting room, with several comfortable chairs, a small table with a book lying on it, a large rug, and a variety of paintings and wall hangings. In addition, you see a pair of statues depicting a curly-haired little girl playing with a hound dog. The statues are a girl, Shiali, daughter of the sculptor Lirekos, and one of the Duke's hunting dogs. They were petrified by Khaadk's magic. The music is coming from an enchanted painting of string quartet that plays when you clap and say "Play" and stops when you clap and say "Stop." It's been playing since the occupants were turned to stone. The instructions for starting and stopping the music are written on a piece of paper glued to the back of the painting. The book on the table is a romance novel, of no particular value to the adventurers.
42. Bathing Room room
This room appears to be a bath. A pair of folding screens divide the room in two, and you can see that a large tub is positioned on the other side. The nearer side of the room contains towel racks with towels still on them as well as an armoire. If the adventurers proceed past the folding screen, they see: The large tub contains statues of two nude women, positioned as if bathing. The tub is full of water. The statues are Corena, wife of Lirekos, and her attendant Saril. The water is cold.
43. Watchtower room
Hanging by leather thongs from the ceiling of this room are three large brass horns. Tables and chairs are in the corners and away from the openings; sitting in a cozy nest of chairs and a table in the northwest are two statues. Statues of men-at-arms in chain mail carrying axes or swords stand gazing out the windows, which are openings four feet tall and six feet wide. Shutters hang over the windows, latched out of the way. The horns are used for signaling different things: a small one will sound only loud enough to be heard inside and in the general area, and the two larger ones can be heard from a distance but have different tones. The smallest can be carried by a man but the larger ones are intended to be left in place and too big to be easily moved around. The statues are all soldiers turned to stone. From marks on the floors in front of the windows it can be deduced that soldiers stand long shifts at the windows looking out over the village and surrounding country side. The two statues sitting in the north east have cups between them and one is raising a bottle of wine, which of course has run empty.
44. Laboratory room
The walls of this room are lined with long, heavy work tables, which are loaded with papers, arcane glassware, and various items useful in magical research. In the middle of the room is a statue of a beautiful woman wearing close-fitting leather armor, a sheathed longsword on her belt. The statue is of Kylenne, and it has been enchanted by Vadarin's wizard Stephan DeSant (whose laboratory this is). Khaadk's magic has corrupted the enchantment; the statue will wait 1d4 rounds before animating, and then will attack anyone in the room. Iron Living Statue: AC 18 (if hit, save vs. Spells or metal weapon is stuck in monster), HD 4*, #At 2 fists, Dam 1d8 fist, Mv 10', Sv F4, ML 12, XP 280
45. Storeroom room
This small room is lined with shelves, and the shelves are loaded down with jars, boxes, bags, and bottles. Every item has a label, but the labels on the items nearest the door are written in an unfamiliar language. The materials in the room are rare substances used by the wizard in his research. The labels are actually written in code, and Stephen DeSant is the only person who knows the code. If the contents of this room are disturbed, the GM is invited to be creative with the results.
46. Wizard's Room room
This is apparently a bedroom, though it is so cluttered that it's hard to tell. There is a large bed centered on the south wall, which is half covered with piles of books and papers. An armoire stands open in the southwest corner, with robes and other items of clothing hanging in and on it. A desk resides in the northwest corner, also piled high with books, papers, ink bottles, and quills, the latter mostly bedraggled or broken. A lantern, apparently illuminated by continual light, rests atop a nightstand beside the bed. Lying on a chest at the foot of the bed is a very cute puppy. When you open the door, it leaps to its feet, tongue hanging out, very excited. As you enter, the puppy remains on top of the chest, even though it looks like it would like to run and jump on you. This is the room of Stephan DeSant, the Duke's wizard-in-residence. The puppy is his familiar; it wears a magical collar that allows it to transform into a dire wolf, which it will do if anyone attempts to approach Stephan's chest or touch any of his belongings (including the furniture). Once it transforms, It will fight to the death so long as anyone remains in the room, but if all interlopers leave the room it will return to puppy form. Dire Wolf: AC 14, HD 4, #At 1 bite, Dam 2d4, Mv 50', Sv F4, ML 9, XP 240
47. Washroom room
This room is brightly lit by a continual light spell in a lantern hanging overhead. A ceramic platter on a table beside the wash stand contains a small pile of ashes; a lingering fragrance suggests that the ashes were once incense. A simple screen stands beside the wash stand. Behind the screen is an empty chamber pot.
48. Study room
Bookshelves filled with books line the walls of this narrow room. A small desk with a chair are positioned in the inside corner to the right of the stairs, with a few papers, a bottle of ink, and a quill pen atop it. A comfortable-looking armchair with a small side-table occupies the opposite end of the room, surrounded by windows on three sides. Everything in this room radiates magic. The chairs are animated and malevolent (see below), so that if anyone sits in either chair, it will snap shut on them like a mousetrap. The victim is may save vs. Death Ray, with success indicating that he or she got out of the chair just in time. Otherwise, the victim suffers damage as given below (1d4 or 1d6) each round. Each round after the first the victim may attempt an "open doors" roll to escape. If a chair is attacked while a victim is trapped, the victim is 50% likely to take half the damage rolled (but the chair still takes normal damage). If no character sits on a chair, after six rounds they will both animate and attack. In addition, once a chair has attacked (either trapping a character or animating), books will be thrown by some unseen force. One attack will be made per round, at a random non- trapped character, attacking as a 2 hit die monster and doing 1d4 points damage on a hit. Ten books will be thrown in this way, and then the ink bottle and quill pen will be thrown; each will do 1d3 points of damage on a hit. If the adventurers leave before the chairs animate, they still ani
49. Alchemist's Room room
This room appears to be an alchemical laboratory; worktables laden with alchemical gear line the walls, except for the diagonal wall where you see a bed, a footlocker, and an armoire. The alchemist himself is here, working at one of the far tables. He turns toward you and says, "Welcome! I was afraid I was the only man left alive in this place!" The "alchemist" is actually a doppleganger. The real alchemist is dead, having been killed by the doppleganger and stuffed in his own footlocker. He's begun to smell, and any Elves or Halflings in the party have a chance equal to 1 on 1d10 to notice the smell of rotting meat in the room; if the locker is opened, the stench will be obvious to all. The doppleganger will do all he can to convince the party he is actually the alchemist, Harcus; he didn't study his subject for very long, but as the adventurers don't know Harcus personally, they are unlikely to figure out he's been replaced. The doppleganger will pretend to be willing to help, and will share what little he knows (somewhere in the fortress is a demon- prison with the powerful demon Khaadk in it; the prison is weakening and Khaadk's power is leaking out) in hopes that the party will tell him what they know, or that he will be able to read what they know from their minds. He wants to release Khaadk, as do most of the monsters in the fortress, but he's willing to bide his time and even pretend to be helping contain the demon in order to get the chance to free him. Doppleganger:
50. Sanctuary room
Painted statues are scattered about this room in various graceful gestures, with the occasional large rug piled with pillows. Tables with vases full of wilted flowers are arranged along the walls. Wind chimes can be heard from the area of the windows. As you look around the room, you are startled by a dull THOCK sound, as of something striking wood. After a moment, you hear it again. The rhythmic sound comes from a bamboo water clock at the west end of the room. The water clock is simple: a section of bamboo, hinged such that it normally stands nearly upright, filled with water from small pipe extending from the wall. As it fills with water, eventually it tips over and slaps a rock, spilling the water so that it rises back upright into the stream of water which begins to fill it again. The pool it empties into has fish and plants and drains very slowly through an overflow. The wind chimes are fine metal and crystal and sound when a breeze comes through the open windows. One hangs in each of the four windows, and each wind chime is worth 100gp; however, they are very fragile. This sanctuary is appointed for relaxing, meditation, and worship. The statues are not truly scattered so much as carefully arranged to provide pleasant areas of privacy. The rugs are thick and the rich pillows soft.
51. Chapel room
This small shrine is occupied by six bugbears, who have apparently been trashing the place. Seeing you enter, they draw their weapons and prepare to do battle. Note: Roll surprise normally and amend the above as needed if the bugbears are surprised. After the bugbears are dealt with: A shrine to the Triune Gods, Prolethra, En- Teare, and Aturahs, occupies the east wall of this room. A narrow table close to the wall is lined with small statues and icons of the gods. A painting depicting the three gods on the portico of the fabled House of the Gods adorns the wall above the table. The shrine is built in to the secret door; the table is actually affixed to it, though it doesn't appear to be at a glance. There is a hidden lever under the top of the table which causes the secret door to open. 6 Bugbears: AC 15, HD 3+1, #At 1 scimitar, Dam 1d8+1, Mv 30', Sv F3, ML 9, XP 145 ea.
52. Secret Closet room
This narrow closet is very dusty and smells of mold. A leather bag with a shoulder strap lies in the northeast corner of the room. Inside the leather bag is 397 sp and 13 ep.
53. Game Room room
In the center of this room you see a round table covered with papers and knickknacks. Five chairs are arranged around it; another identical chair has been pushed back against the south wall. Several small, well-stocked bookshelves are scattered around the room, and the walls are lined with brightly-colored posters advertising various musical shows. The papers on the table are clustered near each chair; four chairs have just a few pieces of paper, while the fifth has a substantial pile. In addition, brightly-painted metal statuettes are scattered around the table, along with many worn, hand-painted dice. In the middle of the table is a large map of an unknown country. The papers represent a strange game, unfamiliar to the adventurers, which involves musicians in an imaginary world as depicted by the map. The papers in front of the four chairs bear the names Davy, Peter, Micky, and Michael, along with incomprehensible statistics and scribbled notes. The bookshelves contain a variety of fictional works. There is no real treasure in this room, or anything else of value to the player characters.
54. Ballroom room
This huge room is obviously a grand ballroom. Many small tables, each having four chairs around it, line the eastern and southern sections of the room; each table has a single candlestick with an unburned candle in it. In the southeast corner of the dance floor is a group of seated white statues, a string quartet apparently. After characters have been in the room 1d4 rounds, read the following: Suddenly, you hear music. Faint, ghostly music, which grows stronger moment by moment. A fog arises from the dance floor briefly, then clears to reveal ghostly dancers performing a stately dance. All onlookers must make a save vs. Wands; anyone failing the save will begin to dance, being joined by a ghostly partner of the opposite sex. After one round, the affected character will become an incorporeal phantom like the other dancers. If an afflicted character is wrestled to the floor before becoming incorporeal, a second save is granted; if it fails, the character becomes a phantom immediately, but if it succeeds, the character is freed from the spell. Any character who flees the room before the dancers appear need not make a save, even if the character stands just beyond the doorway and continues to watch. A character only needs to make one save to be free of the effect; repeated saves are not required, even if the room is exited and re- entered. Whenever Khaadk is either contained or freed, characters transformed into phantoms will be restored to material form.
NPCs HERE • 1
Add via World pageGR
Gravarthan
Ice Dragon Monster 8 • AC 17 • HP 40
MAP & PINS • 54
Tap the map to drop a pin — drag pins to move them.
Tip: click anywhere on the map above — the form appears here with coordinates filled in.