← World Vault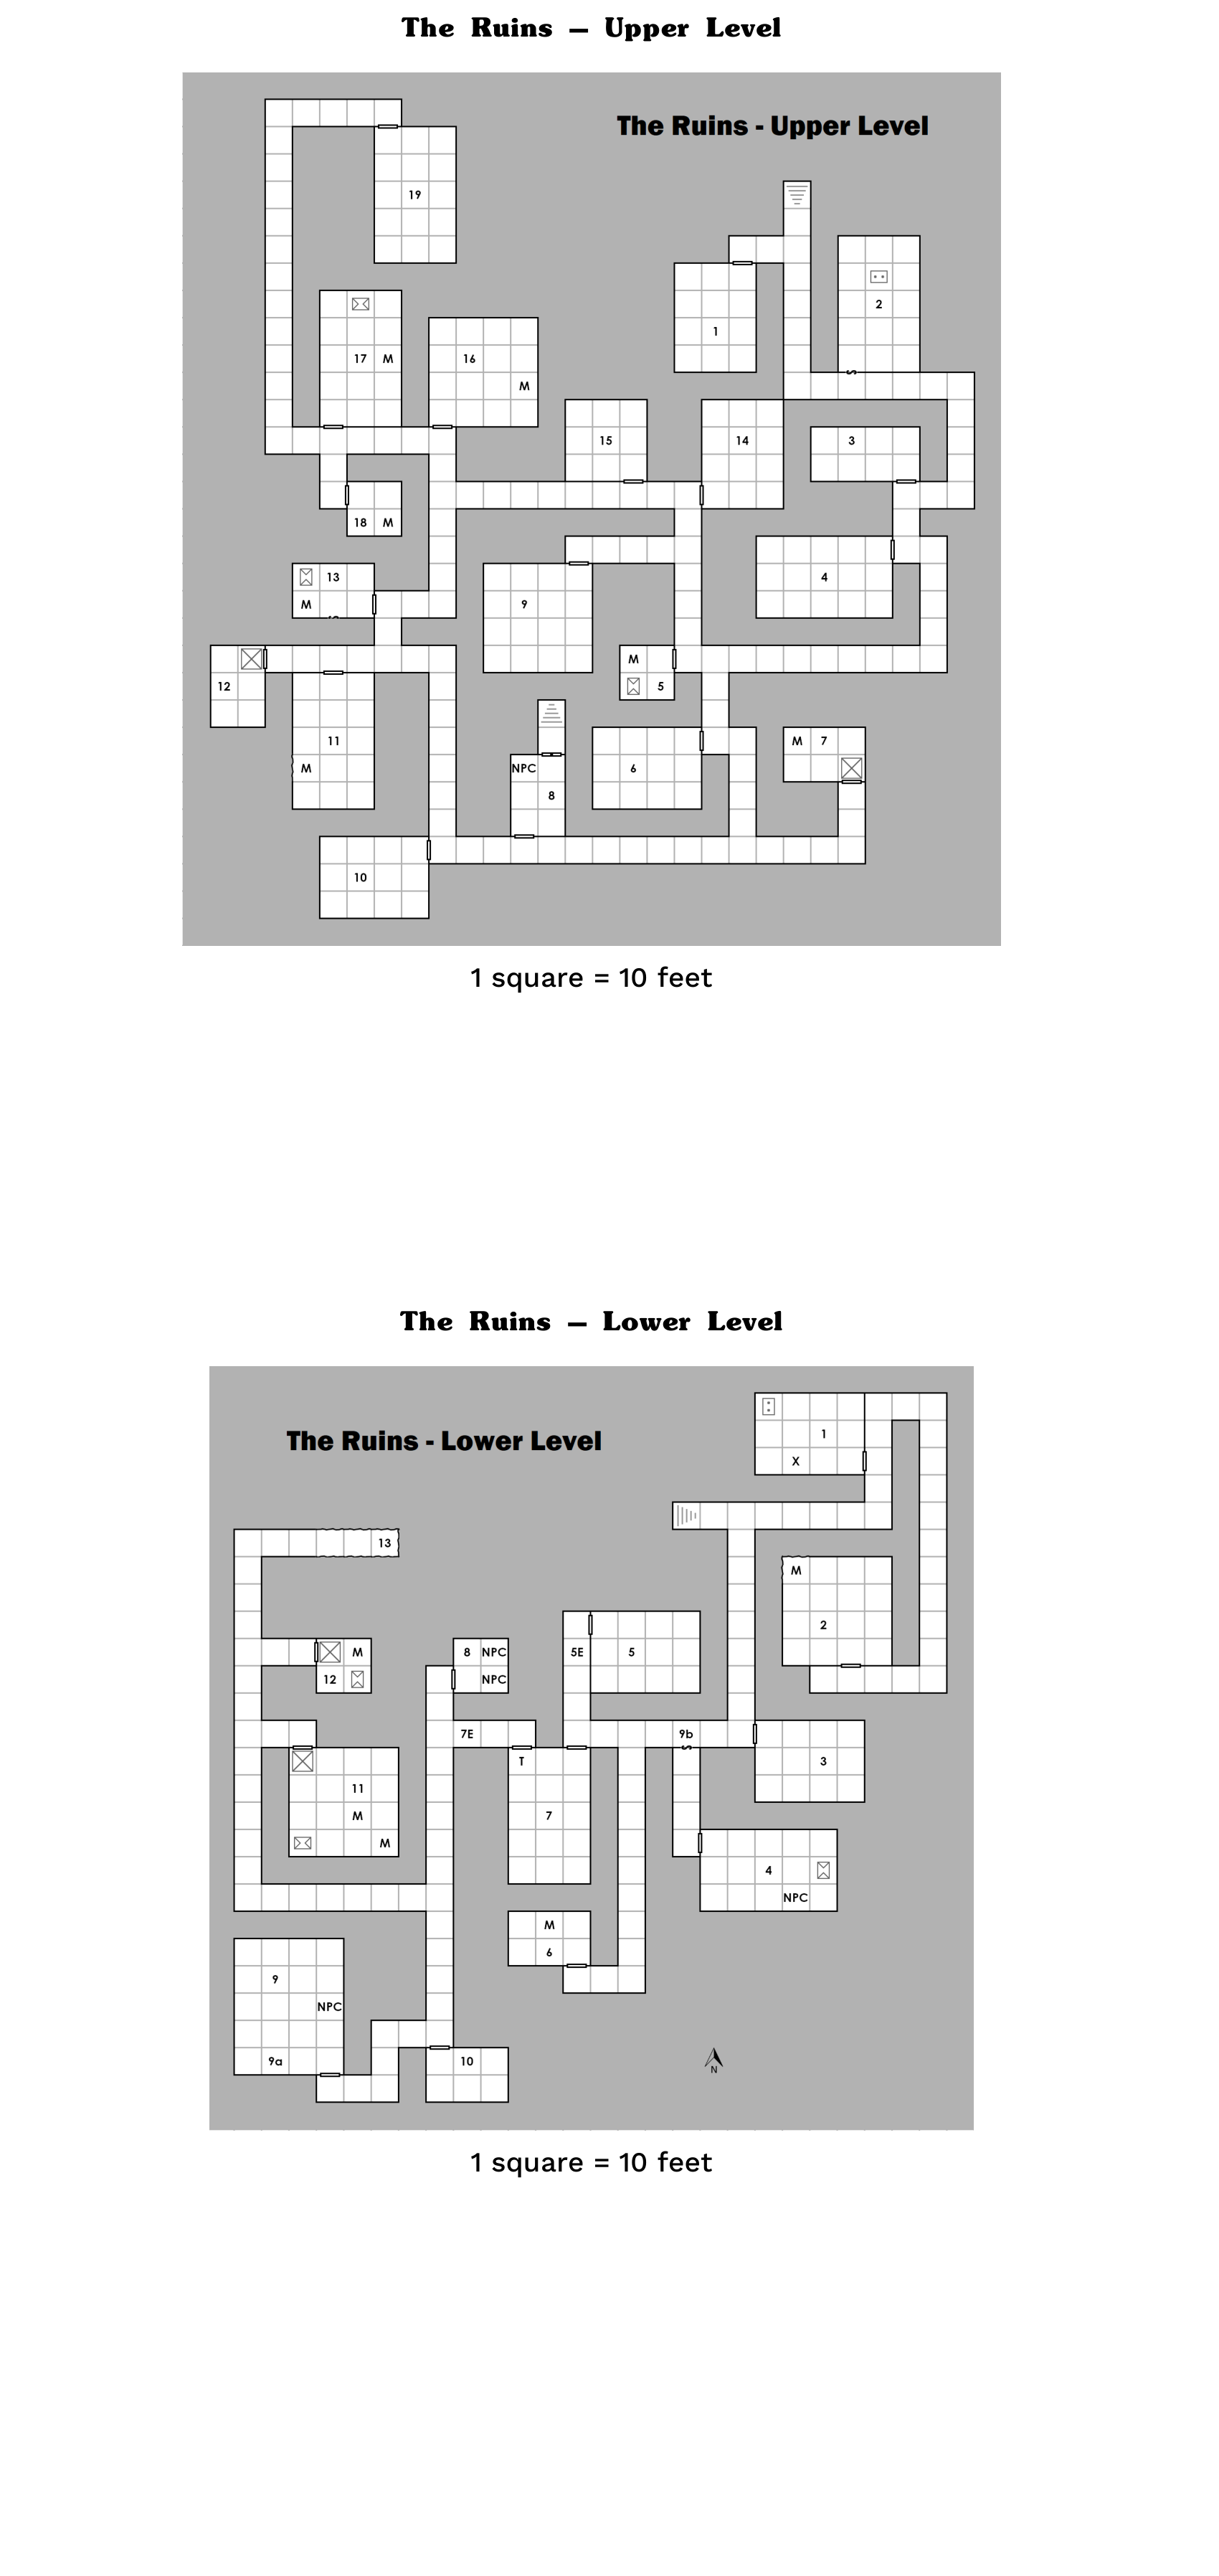
dungeon
The Ruins
dc1-ruins • dc1-ruins • DC1: Tales from the Laughing Dragon
An old ruin about a day's walk from Dale, on the outskirts of Llancrest Wood, the small forest surrounding the southeastern end of Dragon Lake; it was the hunting grounds of the former royal family before the invasion from Albion. Crude map in hand, the adventurers find recent activity around the entrance and small footprints leading in; the stairs lead down south into the darkness. Level 1 (Upper Level) is keyed in The Search for The Missing Gnome (levels 1-2); Level 2 (Second Level -- its map is titled Lower Level) is keyed in The Hunt For Valanunthe (levels 1-2), where Valanunthe is holed up behind the magically locked door that trapped Fonkin.
Wandering Monsters -- The Search for The Missing Gnome (roll every three turns; encounters appear on 1 on 1d6; GM may roll 1d12 or choose; PDF p. 5): 1: Hobgoblin Patrol (2) -- AC 14, HD 1, #At 1 morningstar, Dam 1d8, Mv 30', Sv F1, ML 8, XP 25 ea. 2: Giant Flies (2) -- AC 14, HD 2, #At 1 bite, Dam 1d8, Mv 30' Fly 60', Sv F2, ML 8, XP 75 ea. 3: Goblin Patrol (5) -- AC 14, HD 1-1, #At 1 shortsword, Dam 1d6, Mv 20', Sv F1, ML 7, XP 10 ea. 4: Kobold Hunting Party (8) -- AC 13, HD 1/2 (1d4 HP), #At 1 sling or shortsword, Dam 1d4 sling, 1d6 shortsword, Mv 20', Sv NM, ML 6, XP 10 ea. 5: Goblin Patrol (6) -- as entry 3. 6: Gray Jelly -- AC 12, HD 3*, #At 1 pseudopod, Dam 2d8, Mv 1', Sv F3, ML 12, XP 175. 7: Giant Bombardier Beetles (2) -- AC 16, HD 2*, #At 1 bite, 1 spray, Dam 1d6 bite, 2d6 spray (cone 10' wide by 10' long from rear, save vs. Death Ray for half), Mv 40', Sv F2, ML 8, XP 100 ea. 8: NPC -- Shoshanna Smythe (see NPCs). 9: Mercenary Guards (6) -- Fighter 2, AC 13, HD 2, #At 1 battleaxe, 1 shortbow, Dam 1d8 battleaxe, 1d6 shortbow, Mv 40', Sv F2, ML 9, XP 75 ea. 10: Wolves (6) -- AC 13, HD 2, #At 1 bite, Dam 1d6, Mv 60', Sv F2, ML 8, XP 75 ea. 11: Orc Patrol (8) -- AC 14, HD 1, #At 1 longsword or 1 shortbow, Dam 1d8 longsword, 1d6 shortbow, Mv 40', Sv F1, ML 8, XP 25 ea. 12: Giant Bee (6) -- AC 13, HD 1/2* (1d4 HP), #At 1 sting, Dam 1d4 + poison, Mv 10' Fly 50', Sv F1, ML 9, XP 13 ea. Wandering Monsters -- The Hunt For Valanunthe (same procedure; also used for the first level on the return trip; PDF p. 14): as the Missing Gnome table except: 1: Hobgoblin Patrol (4). 5: Goblin Patrol (8). 7: Gnoll Patrol (5) -- AC 15, HD 2, #At 1 flail, Dam 2d4+1, Mv 30', Sv F2, ML 8, XP 75 ea. 9: Mercenary Guards (6) -- as before. 10: Bugbear Patrol (2) -- AC 15, HD 3+1, #At 1 mace, Dam 1d8, Mv 30', Sv F3, ML 9, XP 145 ea. 11: Orc Patrol (8) -- Mv 30'. 12: NPC -- Willard Rataess (see NPCs).
CHILDREN • 34
E. Entrance room
The entrance to the ruins lies at the bottom of the steps descending south into the darkness. From the faint light you can see the hall continuing south, although there is a break heading west as well. The entrance into the ruins isn't secured by any door; the stairs lead down and open into a stone hallway heading south and then east.
1. Sentry Room room
Although this room stands empty, it's obvious it's been getting a lot of use lately. At the south end of the room is a large table surrounded by a few chairs. There is a large crudely-made mug sitting on the table. It is empty but still contains the dregs of cheap wine at the bottom.
2. Secret Forge room
In the center of this hidden room is an old forge that looks like it hasn't been used in ages. On the south wall an old lamp hangs forlornly, its glass filled with cobwebs and dust. At the entrance of the room, right past the door, is an insidious trap known as the whirling blade trap. If the trap is not detected and disarmed, the first person to step into the room will trigger a pressure plate and a whirling blade will come up through the floor, causing 1d8 points of damage; save vs. Dragon Breath for half damage (add DEX bonus to roll). Other than the forge and the lamp, the room is empty.
3. Another Empty Room room
This small room is almost completely empty. As you look around you do notice some small shards of broken pottery, suggesting that clay pots were stored in here at one time. There is nothing of interest in this room.
4. The Kennels room
This room seems to have seen a lot of traffic throughout the years, but it appears to have been recently used to keep wild animals. You can see a large cage with bits of dark fur in it, with a belt next to it hanging on a rack. There is nothing of interest in this room.
5. Ambush Room room
As you open the door, you hear the unmistakable sound of bones clacking together as two undead warriors turn towards you, sword and shield at the ready. As the party enters the room they will draw the attention of the two skeletons in the room. After the skeletons are dispatched, read the following: This room looks like it was originally created to deliver nasty surprises to those who entered it without permission. There are arrow slits in the wall and murder holes in the ceiling, although an inspection will show that whatever means to get behind them has long since collapsed. There is a small rusted chest in the corner that contains 55 gp worth of assorted coins and 10 sling bullets. 2 Skeletons: AC 12, HD 1, #At 1 scimitar, Dam 1d8, Mv 40', Sv F1, ML 12, XP 25 ea. HP
6. Crude Kitchen room
This large room contains some signs of recent use. There is a shallow pit in the floor, surrounded by stones that looks as if it was used for cooking or warmth. There is also an empty scroll case and a cleaver. The cleaver is so old it's hard to tell if the brown spots on it are rust or blood. Other than the items described, there is nothing of interest in this room.
7. Undead Guardians room
As you open the door, you hear the unmistakable sound of bones clacking together as two undead warriors turn towards you, sword and shield at the ready. As the party enters the room they will draw the attention of the two skeleton warriors in the room. If the party enters the room without checking for traps, however, they will also trigger the pit trap in front of the room. It's a 10-foot fall and will cause 1d6 points of damage unless the character makes a save vs. Death Ray (add DEX bonus to roll) for no damage. However the same would apply to the skeletons if the party draws them out. After dispatching the guardians of the room you see a small table against a the west wall. On the table you find a backpack and a couple of moldy books. The room doesn't contain much more than is described to the adventurers. If they examine the backpack they will find 5 gp and a dagger of exquisite craftsmanship worth 300 gp. 2 Skeleton Warriors: AC 14, HD 2, #At 1 scimitar, Dam 1d8 +1, Mv 40', Sv F2, ML 12, XP 75 ea.
8. Entryway To Lower Level room
When the door is opened, a gnome that could only be Fonkin is found within. He is sitting on a box looking dejectedly at the door in the northern wall. He is startled at first but visibly relaxes when he realizes you aren't monsters and mean him no harm. He gestures to your party to close the door and come inside. The gnome inside this room is Fonkin, the one the party was sent to find. When they tell him that they were sent by the townsfolk to look for him, he explains that he isn't kidnapped or lost. He wound up in the ruins after pursuing an important item that was stolen from him. The thief was an old apprentice of his, and he tracked her down into the ruins and into this room. The trail led to the north door, but when he tried it he found the door magically-locked, with no spell or scroll to unlock it. He tells the party to meet him at the Laughing Dragon Inn when they return to Dale. He will then give the door one more dirty look before he twists a ring on his left finger, whispers some words, and disappears. Besides Fonkin and the empty crate there is nothing in this room of any value. The door to the north is made of thick unbreakable stone. The door is above the level and capability of the adventurers to get through without some outside assistance.
9. Oddly Empty Room room
This large square room is completely empty and contains absolutely nothing in it. It seems odd considering the room's central location in the ruins.
10. Dusty Room room
Due to the door being stuck, this room hasn't been accessed in awhile. There is a fine layer of dust covering the floor that looks to be untouched. The door to this room is stuck and will have to be forced open in order to access it.
11. Rats Nest room
This room is mostly empty except for the fur and bones of smaller animals laying about. There is a medium-sized ragged hole in the southwest corner of the west wall. If the adventurers explore the room and the hole in the wall in particular, they will be attacked by four giant rats that are hiding inside of it. If the hole is further examined they will find a variety of coins worth 6 gp. 4 Giant Rats: AC 13, HD ½ (1d4 HP), #At 1 bite, Dam 1d4 + disease, Mv 40' Swim 20', Sv F1, ML 8, XP 10 ea. HP HP
12. The Pit Trap Illusion room
This room is completely empty except for a large chest in the far south corner. There is nothing at all in the chest; it's meant to lure unsuspecting adventurers to their doom. If one of the characters enters the room they will fall into a pit trap and take 1d6 falling plus 1d6 spike points of damage unless they save vs. Death Ray (add DEX bonus to roll). The floor over the pit is an illusion, so normal trap detection will not work; however, a Magic- user will have a 1 in 1d6 chance of spotting the illusion. A detect magic spell would also detect the illusion.
13. Watchdogs room
As soon as you enter the room you are beset by two very large dark-furred wolves. You eye a chest against the east wall and can only assume these two were left in here to guard it. The wargs were left in here to guard the treasure contained in this room. They are normally kenneled in Room #9. The chest contains 100 gp and 15 crossbow bolts + 1. If a secret door search is successful there is also a hidden panel in the south wall concealing another 100 gp. 2 Wargs (large wolves): AC 13, HD 3, #At 1 bite, Dam 1d8, Mv 60', Sv F3, ML 8, XP 145 ea. HP
14. Holding Cell room
When you enter the room, you can tell that it once was or still is a holding cell of some sort. There are chains and manacles attached to the walls along the east wall. There is nothing of interest in this room.
15. The Bedroom room
This room is being used as living quarters by someone. You find a cooking pot and a brazier surrounded by stones, along with a used pair of boots and an empty pouch. Along the east wall is a built-in wash basin. There is also a small statue of little value in the northwest corner. There is nothing of interest in this room.
16. Spiders room
The skittering of legs on large webs greets you as you enter the room. Two very angry looking spiders quickly close the distance between you and them. The door to this room is locked and trapped. If an attempt to pick the lock fails and the trap was not detected, the thief has to save vs. Poison or be knocked unconscious for 1d4 rounds. If the trap is detected but the removal attempt fails, the same consequences apply. This small room doesn’t contain much other than the spiders. However you do notice a small bag of coins stuck in one of the large webs. Maybe somebody lost them on their escape from this room. The sack of coins in the web add up to about 20 gp when counted out. 2 Giant Crab Spiders: AC 13, HD 2*, #At 1 bite, Dam 1d8 + poison, Mv 40', Sv F2, ML 7, XP 100 ea. HP Note: These spiders are juvenile; victims of their bite must save vs. Poison at a +2 bonus or become unconscious for 1d4 rounds.
17. Patrol Barracks room
This large room appears to be the resting area for a group of hobgoblins. There are a variety of large mats strewn across the room as well as a small chest against the wall. The hobgoblins have wedged a 10-foot pole diagonally in the corner and some uncooked meat hangs from it. There is also an empty jar that smells faintly of wine. This room is where all the hobgoblins on this level live when they aren't on patrol or outside the ruins. Assume that any hobgoblins encountered randomly on this level (wandering monsters) also call this room their home. The chest is unlocked and contains 140 gp as well as chain-mail armor. The armor is of decent quality but is not magical. 2 Hobgoblins: AC 14, HD 1, #At 1 longsword, Dam 1d8, Mv 30', Sv F1, ML 8, XP 25 ea. HP
18. Beetle Room room
This square room is fairly nondescript except for a phosphorescent glowing coming from the far corner. A closer inspection shows that the glowing is four distinct insect-like shapes. This room contains nothing of value except for the 4 large fire beetles huddled in the far corner of the room. The beetles won't attack unless cornered or attacked first. 4 Giant Fire Beetles: AC 16, HD 1+2, #At 1 bite, Dam 2d4, Mv 40', Sv F1, ML 7, XP 25 ea. HP
19. North Room room
This room, at the far end of the long hallway, appears to be empty but has seen some recent use. There is a broken lantern and some manacles in the middle of the room, as well as a broken statue in the corner. A brief inspection of the statue shows that it is surrounded by some sort of animal fur.
1. Dead Man's Party room
It looks as if some poor unfortunate person just met their untimely demise in this room. The body doesn't appear to have been here long and the torch on the wall is still burning. When you roll the body over to check it, it becomes apparent that he had been stabbed in the back. Besides the dead victim, the only other thing in this room is a small altar in the northeast corner. This door is locked and the wood it is made of is quite strong. If the door can't be picked and the party is going to try and strong arm the door, roll 1d12 instead. If anyone is from the town of Dale they will recognize the body of one of the Town Guard, Boots Claymore.
2. Centipede Folly room
There isn't much to this room when you first enter it. It appears to be completely empty with the exception of some refuse in the northwest corner. If the party disturbs the refuse in the corner they will be attacked by a very large giant centipede hiding among it. It seems to be eating well, hence the larger amount of hit points. If the centipede is dispatched and the refuse checked, they will find loose coins worth 10 gp. Giant Centipede: AC 11, HD 1d4 HP*, #At 1 bite, Dam poison, Mv 40', Sv NM, ML 7, XP 13
3. Another Empty Room room
This room is completely empty, although it looks to have been maintained recently. It's been swept clean and there is very little dust on the floors or walls.
4. Valanunthe's Room room
There is no doubt the elf knows you're coming. As you open the door a blue sizzling dart of energy flies toward you, followed closely by another arrow of the more mundane sort. So begins the battle against Valanunthe. She is a 3rd-level Fighter/Magic-user and she has access to 2 more spells for the day: another magic missile and invisibility. She will use her invisibility spell to disappear if she feels the fight going against her. She fights with a composite longbow and a longsword +1. The bow allows her to add her Strength bonus to the damage done by the arrow. After her initial magic missile/bow salvo she will switch to her longsword +1 for the rest of the encounter. This appears to be the room that Valanunthe has set up as her own. There are several books stacked next to a small cot against the south wall. There is also a weapons rack here but it is empty. A quick glance reveals a small chest hidden under the cot. In the chest are 400 gp, a gem worth 50 gp, and the following note: Valanunthe, I am setting up at the keep. Once I get settled in I will send a war party your way with the payment we discussed. Make sure you have the map ready and waiting when they get there. I already don't like this place. – Girck If Valanunthe is searched the party will find another 70 gp, a longsword +1, her composite longbow, and the amulet of the mighty fist. If the books are examined here are the titles and possible worth: • Life of Galad the Impetuous (1 gp) • The Art of Love Vol I (1 g
5. Hobgoblin Barracks room
This room looks to be another room converted into a barracks. This is where the hobgoblin troops were making their home. You see a large cupboard against the south wall where the hobgoblins were keeping their odd bits of collected treasure, however none of the items there look to be worth much. There is a silver candelabra with the candles still in it that might be worth 10 sp, an empty pouch that smells vaguely of troglodyte, and a banged up trophy of some sort. The inscription on the trophy is in common and says 'E for Effort'. The door to the room is locked, so the party will either have to pick it or break it. However if they've killed the hobgoblins from Encounter 5E and search the bodies, the key to the room will be found. 5E. WHAT ARE YOU DOING HERE? This encounter takes place if the party either comes out of the northeast door of Room #10 or if they come around the corner from the hallway right in front of it. As you look down the hallway you see four Hobgoblins talking amongst themselves while one is closing a door to the east. They seem very relaxed and have no idea that you are there. In this encounter the party gets one free surprise round since the hobgoblins aren't paying attention. Once this round is complete, continue the fighting as normal. If the party wins the fight a search of the hobgoblins will find the key that opens Room #5. 4 Hobgoblins: AC 14, HD 1, #At 1 longsword, Dam 1d8, Mv 30', Sv F1, ML 8, XP 25 ea. HP
6. Troglodyte Barracks room
The overwhelming smell of Troglodytes assails your senses as you open this door. Two very surprised troglodytes turn towards you as you enter the room. This room is where the troglodytes were assigned to live since it's down a long hallway and away from the rest of the rooms in this level. Because of the smell, the party will have a 2 in 6 chance of smelling the troglodytes and knowing they are in the room before opening the door. You look around the room and see that it has been set up as a temporary barracks for the troglodytes. It seems to make sense why they were down here at the end of this long hall in a room by themselves. Not even other creatures want to make a point of sleeping next to them. A quick search of the room uncovers 40 gp just laying on the floor as well as a heavy crossbow +1. 2 Troglodytes: AC 15, HD 2, #At 2 claws, 1 bite, Dam 1d4 claw, 1d4 bite, Mv 30', Sv F2, ML 9, XP 75 ea. HP
7. The Transfer Room room
This large room contains two doors on the north wall, one on the far west, and the other on the far east. There is nothing in this room other than an odd stain near the northwest door. The door at the east end of the north wall is trapped. If it is not disabled before the door is opened it will trigger a fire trap inflicting 1d6 points of fire damage to anyone with 10 feet of the door (save vs. Dragon Breath for half damage). 7E. SURPRISE! As you enter the hallway from the room you are assaulted by arrow fire coming from the north; a quick glance that direction shows a highly organized orc party already in defensive positions. Four orc fighters stand ready to block the hallway as two archers ready another volley. The orcs have been placed here to keep any interlopers from this side of the ruins, since the only way in and out is through the doors in room 10. The party doesn't know that anyone opening that door is supposed to call out a password before entering the hallway (although this may be revealed to the party by a creature trying to save its own life. If that happens, this encounter can play out differently). The two orc archers have surprise and will get a free attack round, and will attack as soon as the first character enters the hallway. They also get a +2 to their initiative the next round as well. 4 Orc Fighters: AC 14, HD 1, #At 1 longsword, Dam 1d8, Mv 30', Sv F1, ML 8, XP 25 ea. HP 2 Orc Archers: AC 14, HD 1, #At 1 shortbow or 1 shortsword, Dam 1d6, Mv 30', Sv F
8. Dwarf Mercenary Barracks room
You hear someone utter 'Well..well..well.. what do we have here?' as you enter the room. The language is Common, but the accent is definitely dwarfish. You see two Dwarf fighters ready their weapons as they turn to face you. The two Dwarf NPCs in this room are mercenaries hired by Valanunthe from a mercenary guild known as the 'Black Fist'. Since they are mercenaries they won't hesitate to leave the fight if it starts looking bad for them. If one of them dies, or either get below half their hit points, recheck their morale. This room looks like the impromptu sleeping area for the two dwarves encountered in this room. There are two bedrolls in the corner and what looks like dirty plates beside them. If either of the dwarves are killed during the encounter and the body/bodies are searched the party will find 60 gp and a note, which says: Find Valanunthe at the Minstrel’s Flask for the details of the contract. She will inform you when you meet. – Edgar Using the Ability Rolls rule found on p. 189 of the Basic Fantasy RPG Core Rules (r139), have each of the players roll against the table using INT as their bonus. If any beat the roll they will know that the ‘Minstrel’s Flask’ is an inn in Stone Bottom. If they beat the roll by 5 or more, they also know that Edgar Lothorio runs that Inn. Cagbral Maryam, Dwarf Fighter 2: AC 13, #At 1 shortsword, Dam 1d6, Mv 40', ML 6, XP 75 STR 14 (+1), WIS 6 (-1), CHA 6 (-1) Equipment: leather armor, shortsword Urias Banhammer, Dwarf Fighter 2: AC
9. Captain Of The Guard room
If the party has not come across Willard Rataess (Random Encounter #12), read the following: You see a man sitting at a small table being used as a desk. He looks up at you, his beady eyes searching for recognition before he leaps out of his chair and pulls his sword. The man in this room is Willard Rataess. The leader of the Black Fist mercenaries here in the ruins, as well as Valanunthe's second in command. He is also a wererat, and although he will not transform into a rat he will take the form of a ratman if harried. Only read this part if Willard was not in the room: It looks like somebody is living in this area but is not at home. Read the following whether Willard is present or not: There is a lantern and some fuel oil sitting on a crate, as well as a bedroll lying on top of some straw bedding in the far corner of the room. In the east wall there is a small recess containing an empty wash basin. Against the south wall you see a small table and a single chair. On the table is a small chest. On the west wall is a lever in the 'Up' position. The chest contains 100 gp and a silver dagger. If the lever (9a) is pulled read the following: You hear a faint rumbling sound as if something large is sliding against stone. This lever reveals a secret hallway leading to Valanunthe's room. It also alerts Valanunthe that the door has been opened, so she will be aware. If someone in the party rolls a 1 on a 1d6 (dwarves get a 2 on 1d6) they will have an idea where the wall opened up (f
9b. Secret Hallway room
As you pass by the hallway heading west, you notice that it's not on your map. The lever you pulled earlier must have revealed this secret hallway. This hallway was revealed by pulling the lever in room 9. If the characters do not detect and disable the trap, a pressure plate will fire an arrow trap as soon as the party steps into the hallway. It is fired from the wall at the west end of the hallway. It will fire 4 arrows at the party. Each arrow is an attack vs. the front character's AC. If the arrow misses by 5 or more, it completely misses the front character and the character behind will also need to roll an AC check; any hit does 1d6 points of damage.
10. Empty Room room
This room is completely empty, although it looks to have been maintained recently. It's been swept clean and there is very little dust on the floors or walls.
11. Kobold Barracks room
The distinctive 'yark yark' barking of kobolds can be heard as you open the door. You look in and see 3 kobolds furiously spinning their slings as two larger kobolds move closer to engage you. This room is going to be a nastier surprise for the party than they were expecting. The kobolds were brought in to help set and create the traps in these ruins. As the party steps into the room there is a pit trap that drops them into a 10' pit. Anyone failing a save vs. Death Ray (adding in their DEX bonus) will fall into the pit. If they do not get out of the pit by the next round, a square part of the ceiling will drop down and crush them for 2d6 points of damage; if they save vs. Death Ray, they only take half damage. The two larger kobolds attacking the party are kobold warriors and are a bit tougher than the average kobold. The smaller kobolds will try to keep a distance from the party, peppering them with sling bullets while the bigger kobolds engage them. If the warriors are dispatched, the smaller kobolds will have to do a morale check at ML 6 or flee the room. If they make the save they will drop their slings and pull out their short swords. It's obvious from the ingenious trap sprung on you, and from the various trap making materials in this room, that the kobolds were hired by Valanunthe to set them up. There is a small area on the west wall set aside for sleeping, and it's here that you see a small chest. The chest will be the last test of the kobolds. It's locked and trapp
12. Bugbear Barracks room
As you open the door to this room, you see a smiling bugbear waiting for you across the room. He yells out taunts at you in the few words he knows in common as if welcoming a good fight. The bugbear doesn't have a death wish; he is hoping he can get the players to commit to charging into the room, since there is a pit trap right in front of the door. If they do come charging in they will take 1d6 falling plus 1d6 spike points of damage from the pit unless they save vs. Death Ray (add DEX bonus to roll). The bugbear's room seems to mirror the temperament of its previous owner. There are pieces of broken furniture laying around as well as rags and other various odds and ends. In the corner is an ancient iron maiden; a look inside of it will reveal a very dead goblin. Around its neck is a sack containing 170 gp. Bugbear: AC 15, HD 3+1, #At 1 mace, Dam 1d8+1, Mv 30', Sv F3, ML 9, XP 145
13. Sappers room
As you come to the corner of the hallway, you start to hear the distinctive pounding and banging of active construction. As you look around the corner down the hallway going south you can see a crew of goblins working down the hallway. A quick inspection reveals that this part of the ruins is all new construction and that they are working on expanding the ruins. The goblins are actively working and are not aware of the party's presence. There is a good chance, however, that as they move down the hallway they will be spotted. When starting combat give the party +2 to their initiative for the first round. There is not much of interest here at the construction site other than various tools used for mining: rock picks, wheelbarrows, and so on. 5 Goblins: AC 14 (11), HD 1-1, #At 1 morningstar, Dam 1d8, Mv 20', Sv F1, ML 7, XP 10 ea. HP
NPCs HERE • 1
Add via World pageSH
Shoshanna Smythe
Fighter 2 • AC 18 • HP 6
MAP & PINS • 0
Tap the map to drop a pin — drag pins to move them.
Tip: click anywhere on the map above — the form appears here with coordinates filled in.